PHD2 Drift Alignment Tool
The drift align tool in PHD2 can be used to quickly
obtain a precise polar alignment of your equatorial mount. The process
takes a little bit of practice, but after doing it a few times, you
should be able to obtain an accurate polar alignment in minutes.
You can use either a separate guide scope or the main scope for
doing the alignment, whichever is more convenient.
Preparation
- Make sure your mount is reasonably level.
- Make sure your scope is balanced and ready for guiding.
- Try
to get your mount's polar axis roughly aligned by using your mount's
polar alignment scope if it has one. Otherwise, make sure the mount's
polar axis is pointing towards the pole, and the altitude setting
corresponds to your local latitude.
- Make sure you can see your computer screen when you are standing at the mount.
- Start PHD2 and connect your equipment.
- You should be using an up-to-date version of PHD2..
- These
instructions assume you have an ASCOM connection to your mount so PHD2
knows where your scope is pointing. You can still drift align without
an ASCOM connection, see Note about ASCOM.
- Calibrate
on any convenient guide star, preferably at a declination within 20
degrees of Dec=0, or reload an accurate calibration if you have
an ASCOM or Indi mount connection. Be sure the calibration is
correct for the side-of-pier where you plan to do the alignment.
If you're using an 'on-camera' guiding interface, do a fresh
calibration from the side-of-pier where you plan to do the alignment.
If the calibration is not correct for the current side-of-pier,
the direction of drift will change and any direction-related notes you
made previously won't be correct.
- Make
sure your PHD2 settings have the correct values for your guide scope
focal length and your guide camera pixel size. (Brain => Global tab
for focal length, Camera tab for pixel size)
Now you are ready for drift aligning.
Azimuth Alignment
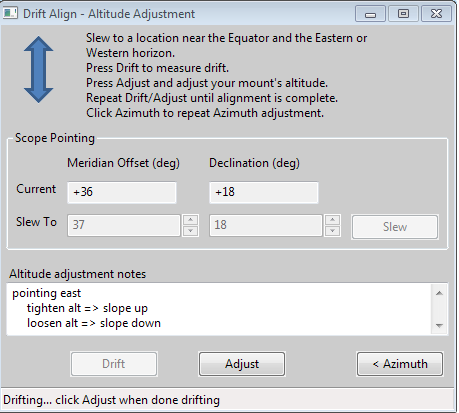
Open the Drift Align Tool:
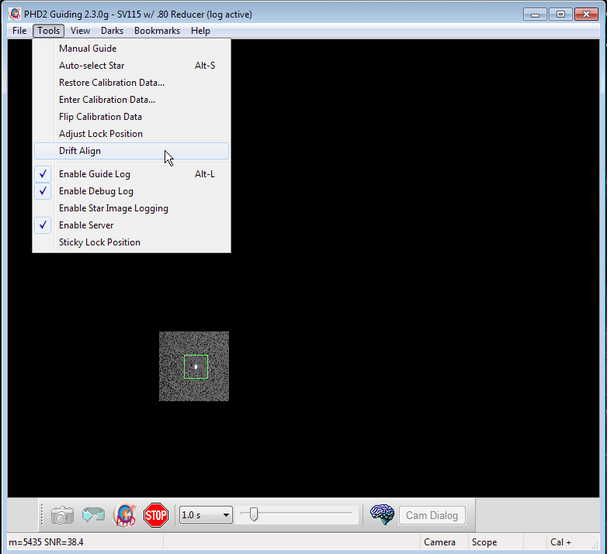
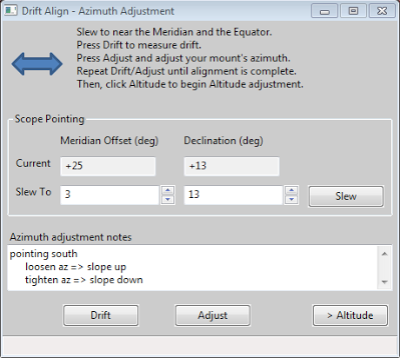
You will see a window like this:
Position
your scope for the Azimuth axis adjustment. Point near the Meridian and
the celestial equator. You can either click the 'Slew' button, or move
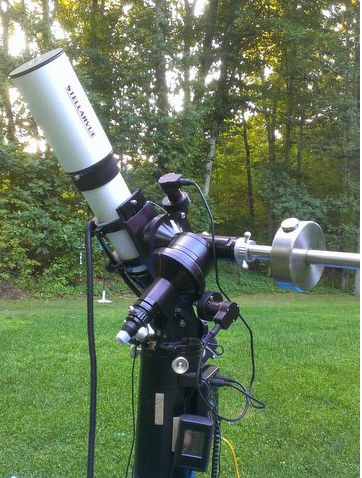
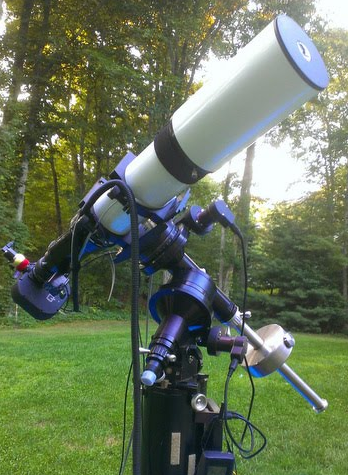
the mount manually. Your scope should now be pointing something
like this:
And the Drift Align window will look like this:
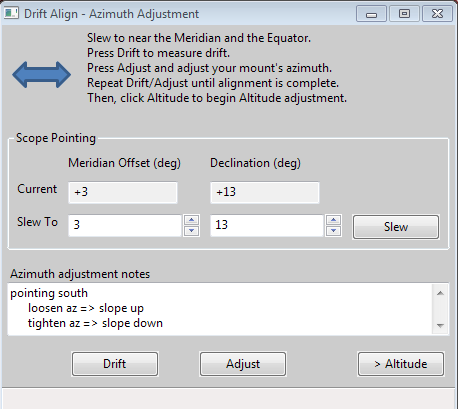
Notice we are only a few degrees off the meridian ("Meridian offset"), and close to the equator (small value of Declination.)
You
are going to alternate between measuring the error ('Drift'), and
adjusting the mount ('Adjust'). The rate of declination drift tells us
the amount of alignment error. Each adjustment will reduce the error,
and you repeat the process as many times as you need to get the error
close to zero.
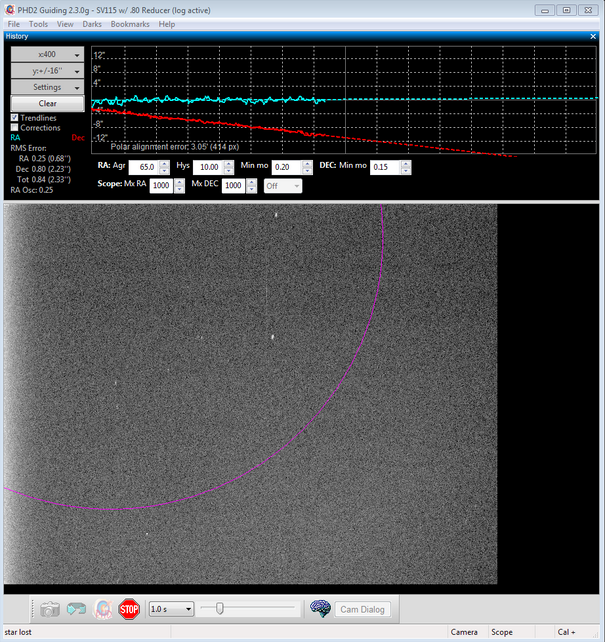
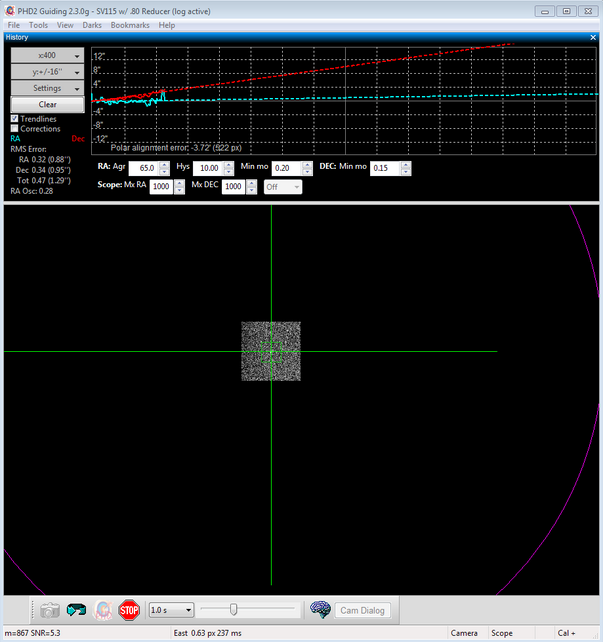
Click 'Drift' to start measuring the declination
drift. PHD2 will select a guide star and start guiding. After a few
moments you should see something like this:

Pay
particular attention to the Declination trend line (Red). At first the
Dec trend line will be jumping up and down, but soon the noise should
"average out" and the slope of the line will become somewhat stable.
When that happens you are ready to adjust the mount's Azimuth.
Our
goal is to make the Dec trend line "flat" -- neither trending up nor
down over time. By adjusting the mount's azimuth, you will change
the slope of the Dec trend line.
If this is your first time
adjusting Azimuth, you will not know which way to go--East or West?
PHD2 does not know either, so you just have to guess, and you have a
50-50 chance of getting it right. If you choose correctly, the
new drift line will be flatter (less steep, closer to horizontal)
If you choose incorrectly, the drift rate will increase (more steeply
downward in the example above.)
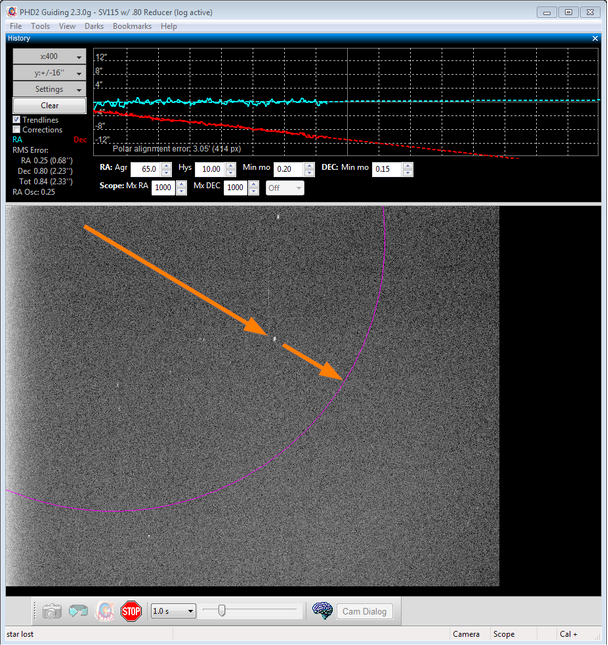
Click the 'Adjust' button. PHD2 will stop guiding, and you can make your adjustment. You'll see something like this:
Slowly
turn your mount's Azimuth adjustment, watching the screen and moving
the guide star towards the magenta circle. The magenta circle shows how
far the guide star needs to move. The magenta circle is larger when the
Dec slope is steeper, and it may initially be so large that it is not
visible on the screen. That's to be expected; if it is not visible,
just move the guide star approximately the width of the screen.
If you do see the magenta circle, you should move the guide star to the
circle, like this:
After
moving the guide star, click 'Drift' to make another measurement.
Before you click 'Drift', it's OK to nudge the mount to re-center the
star, or to find a different star, or to get back closer to the
meridian. Also, you can choose your own guide star by clicking on
it, or just let PHD2 choose.
After a short time drifting, you
will have another Dec trend line. Did it get better (closer to
horizontal) or worse (away from horizontal)? Make a note to yourself in
the "Azimuth adjustment notes" area, recording how you adjusted azimuth
and which direction the Dec slope moved. You can use this
information next time you drift align so you do not have to guess which
way to make the azimuth adjustment. For example, with my setup,
turning the azimuth knob clockwise makes the slope go down. Having the
note there reminds me that I need to turn the azimuth knob
counter-clockwise to make the slope go up.
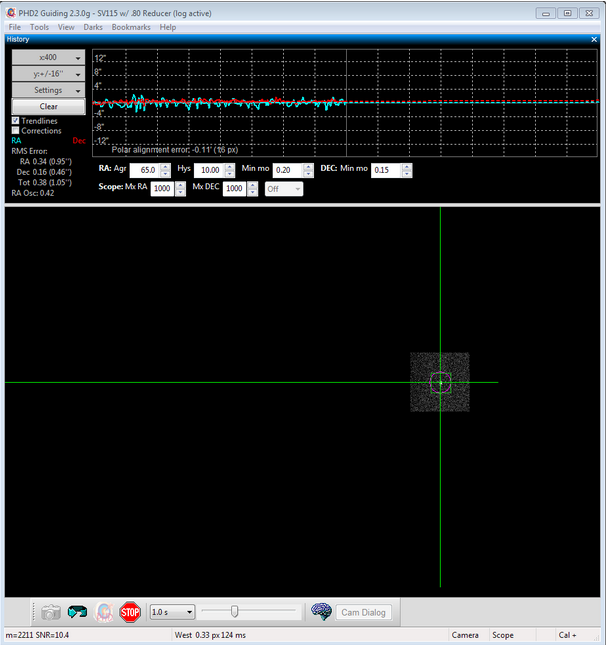
Repeat the measurement and adjustment of the mount until you achieve a good flat horizontal dec trend line, like this:
Altitude Alignment
Now,
you will need to repeat the process for the mount's Altitude
adjustment. Click the Altitude button; the Drift tool will now
look like this:
Click 'Slew' or manually slew your mount toward the horizon (east or west):
The exact position is not important, but 23-35 degrees above the horizon works well.
Click 'Drift' to start drifting.
Drift
until you have a stable Dec slope. Click Adjust, then turn the mount's
Altitude adjustment knob. Use your notes recorded in the
"Altitude adjustment notes" area from a previous session to determine
which way to turn the knob to move the slope in the desired
direction. For example, with my setup I turn the altitude knob
clockwise to make the slope go "down".
Just as with the Azimuth
adjustment, repeat cycles of Drift and Adjust making the measurements
and moving the guide star to the magenta circle. Again, the goal is to
get the dec drift line to be horizontal.
Using Bookmarks
Until you are experienced with drift aligning your particular mount, the
'adjustment' part of the process can be a bit tedious. At first,
you'll have to determine how to adjust a knob on the mount to achieve
the desired effect: "how much" and "what direction." To help with
this, the PHD2 drift align
tool supports "bookmarks". These are a handy way to record the
positions of the guide star before and after you've made an adjustment.
Bookmarks are accessed using the Bookmarks menu, or keyboard shortcuts, as follows:
- b : toggle/show bookmarks
- Shift-b : set a bookmark at the current guide star position (the "lock position")
- Ctrl-b : clear all bookmarks
- Ctrl-click somewhere on the image: set a bookmark at that position, or remove the bookmark that's already there
By setting a bookmark before you make a mount adjustment, you can get a
clear view of how the adjustment has moved the star on the guide frame.Notes about ASCOM
The
instructions and screenshots above correspond to what you see in PHD2
with an ASCOM or INDI connection to the mount. There are a couple
of differences if you do not have one of those connections.
- Scope
position data and slewing functions will not be available - you'll have
to slew the scope yourself. Keep in mind, the target
altitude/azimuth positions are only approximate - you don't need to be
particularly concerned about accuracy - just get reasonably close with
a good guide star available in the field of view.
- The
solid magenta circle becomes a dashed-line magenta circle. The dashed
magenta circle represents a limit to how far the guide star needs to
move, not the exact distance. We only know that the star should not
move past the circle. Rather than moving the star all the way to the
circle, you may want to only move it half-way or so as an initial
guess. You can use Bookmarks to keep track of where the guide
star was in each Drift/Adjust iteration.
PHD2
Static Polar Alignment (SPA) Tool
The Static Polar Alignment tool provides two modes of operation.
Automated mode requires a mount that can slew under computer control
and report its position. Otherwise manual mode is available for ST-4
type guiding ('On camera', GPUSB, etc) or for mounts that are manually
controlled. The SPA tool selects the most appropriate mode according to
your mount's capabilities.
Automated Mode
In the automated mode, PHD2 will slew the telescope as needed to perform
the alignment procedure. To do this, PHD2 must be connected to the mount through
either an ASCOM or INDI interface, and the mount must be initialized and ready to
perform go-to (slewing) operations. To get started, perform the following steps:
- Connect PHD2 to your camera and to your ASCOM or INDI mount driver
- Be sure that PHD2 has already done calibration for this set-up
- Manually adjust the mount’s RA axis to point within 5 degrees of the apparent
pole, then slew the telescope to point to Dec = +90 or -90. On a German equatorial mount,
it’s best to start with the mount in the counterweight-down orientation,
pointing at the pole. Use star alignment or plate solving to get as close as practical
to Dec = +90 or -90 degrees.
- During the alignment process the mount will slew 10 degrees west, so make
sure there is nothing to obstruct the view or interfere with the scope’s
rotation.
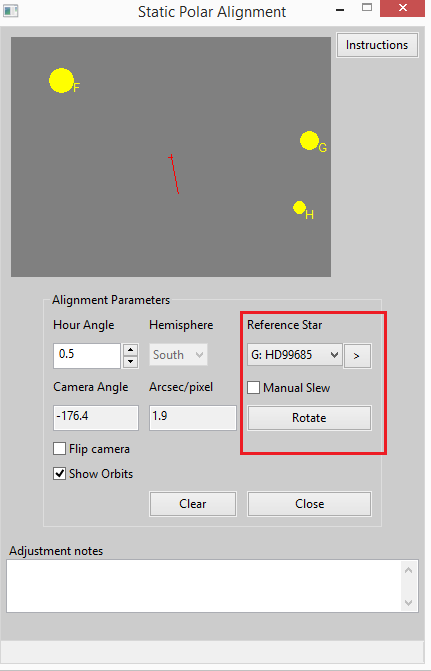
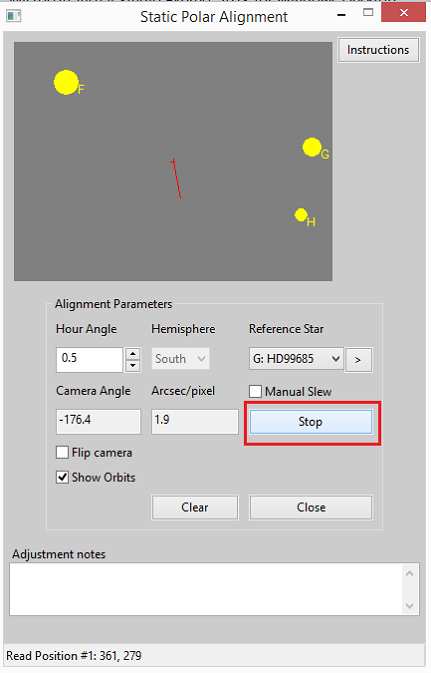
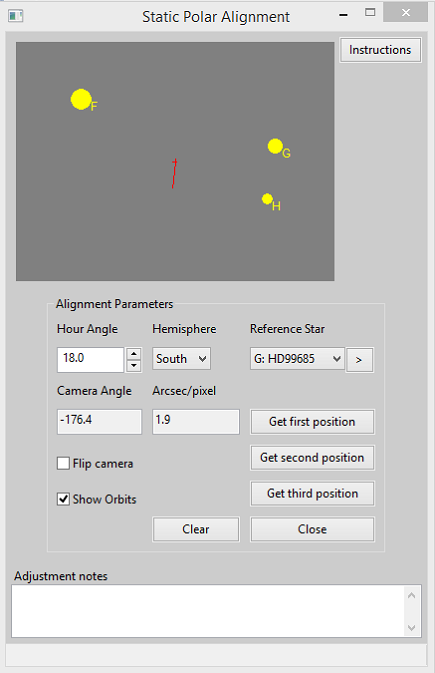
Now open the SPA tool via 'Tools'/'Static Polar Alignment', and the
first window will open:
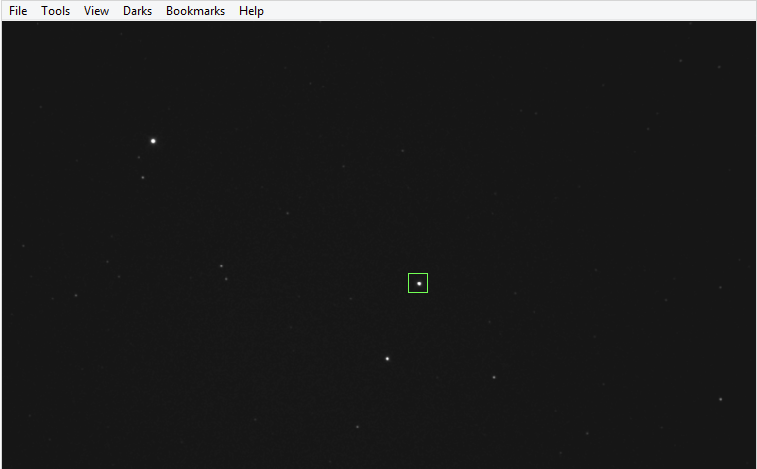
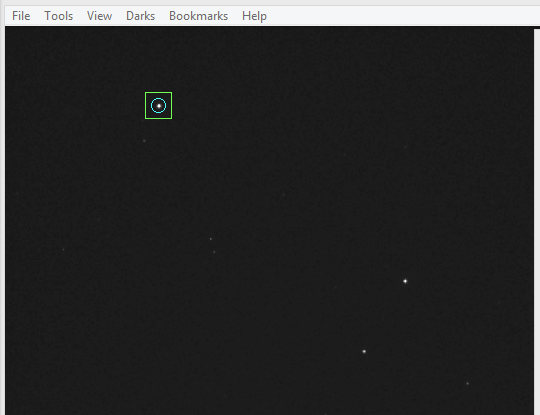
The PHD2 main display would look like this (southern pole example):
The star map at the top of the SPA window shows the
approximate position of the polar stars oriented according to your PHD2
calibration and mount position. You can
adjust the ‘Hour Angle’ control or use the
‘Flip Camera’ option to orient the
star map to the main display. To pan the star map you can double click
the point you want at the center; or click the ‘>’ button to center
the selected reference star.
The button to the right of the star map lets you toggle between displaying the star
map or instructions for using the SPA tool.
You have the option to use manual control by ticking the
‘Manual Slew’ checkbox. Refer to the instructions below for
manual-mode alignment.
Use the star map to select a ‘Reference Star’ on
the main PHD2 display.
Identify which star you selected with the drop-down list. Don't worry if you
don't get it right; it can be corrected later.
When you are ready to start aligning, click ‘Rotate’.
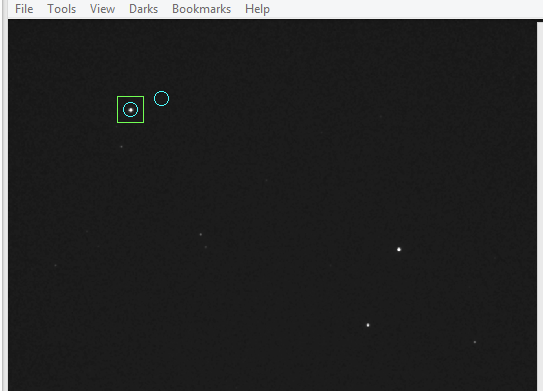
The current position is indicated with a small blue circle on the main display, and
the coordinates are displayed in the status bar. Note that the ‘Rotate’ button has
changed to a ‘Stop’ button. If you want to quit or stop the mount slewing, click the
‘Stop’ button.
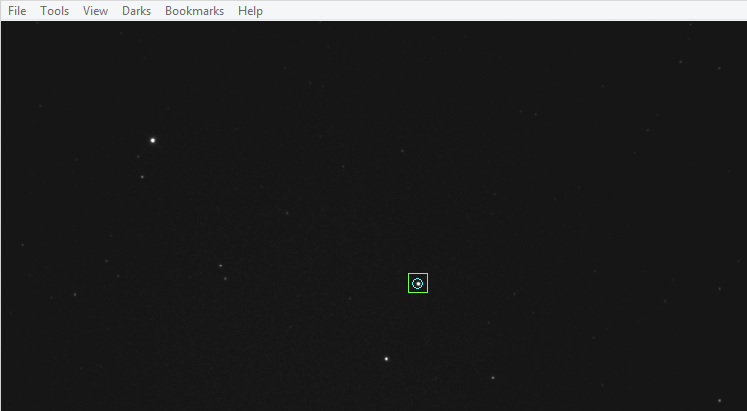
After you click 'Rotate', the mount will slew west in RA in small steps as indicated in the status bar.
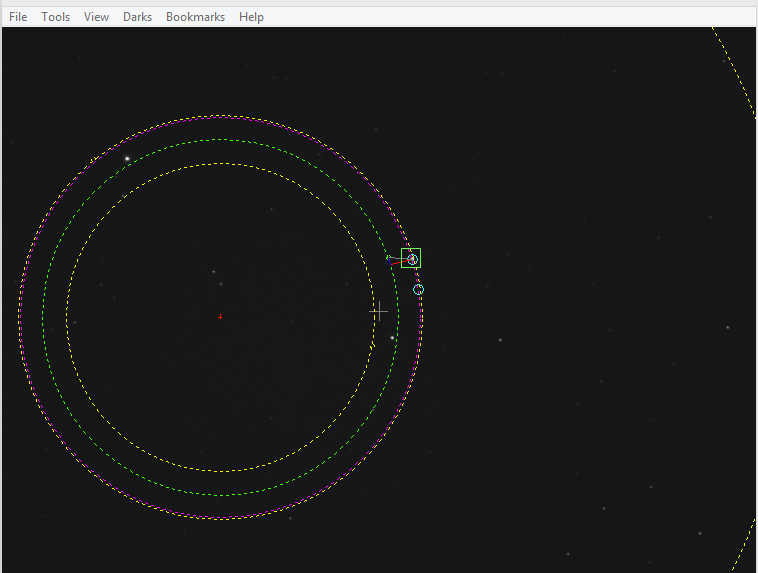
Once two points have been recorded, the alignment graphic is overlaid on the PHD2 main
display.
If you made a mistake identifying your ‘Reference Star’, select the correct one in
the drop-down list.
Now follow the instructions under Using the Polar
Alignment Overlay to adjust your mount’s polar alignment.
Manual Mode
If you don’t have a mount driver that supports go-to’s or
you want to retain manual control of scope slewing, you can use the
manual mode of operation. To get started, perform the following steps:
- Connect PHD2 to your camera and to your mount’s guider interface (e.g. ST-4)
- Be sure that PHD2 has already done calibration for this set-up
- Manually adjust the RA axis to point within 5 degrees of the apparent pole, then manually
slew the telescope to point to Dec = +90 or -90. On a German equatorial mount, it’s best
to start with the mount in the counterweight-down orientation, pointing at the pole. Use
star alignment or plate solving to get as close as practical to Dec = +90 or -90 degrees.
- During the alignment process you’ll need to slew the mount up to 15 degrees
west, so make sure there is nothing to obstruct the view or interfere
with the scope’s rotation.
Now open the SPA tool via 'Tools'/'Static Polar Alignment', and the
first window will open:
The star map at the top of the SPA window shows the
approximate position of the polar stars oriented according to your PHD2
calibration and mount position. You can
adjust the ‘Hour Angle’ control or use the
‘Flip Camera’ option to orient the
star map to the main display. To pan the star map you can double click
the point you want at the center; or click the ‘>’ button to center
the selected reference star.
The button to the right of the star map lets you toggle between displaying the star
map or instructions for using the SPA tool.
You have the option to use manual control by ticking the
‘Manual Slew’ checkbox. Refer to the instructions below for
manual-mode alignment.
Use the star map to select a ‘Reference Star’ on
the main PHD2 display.
Identify which star you selected with the drop-down list. Don't worry if you
don't get it right, it can be corrected later.
When ready, click ‘Get first position’. The current position is indicated with a small
blue circle on the main display, and the coordinates are displayed in the status bar.
Slew the mount at least 20 minutes west in RA (RA decreases as you slew west).
Select the same reference star on the main display.
Click ‘Get second position’. The position is marked with another small blue circle and
the coordinates are displayed in the status bar.
Slew west another 20+ minutes in RA and select the same star again.
Click ’Get third position’.
After a few moments the alignment graphic is overlaid on the main display.
If you made a
mistake, select the correct ‘Reference Star’ in the drop down list.
Similarly, if any of your alignment points are suspect, slew the
mount to the bad point and click the appropriate button to replace its coordinates. If
you had to slew eastwards then it’s best to overshoot and make your final slew
westwards to clear any backlash. Alternatively, slew westwards to a new position and
replace the bad point. The points do not have to be in order.
The corrected alignment graphic updates automatically.
Follow the instructions in the next section to adjust your mount’s polar alignment.
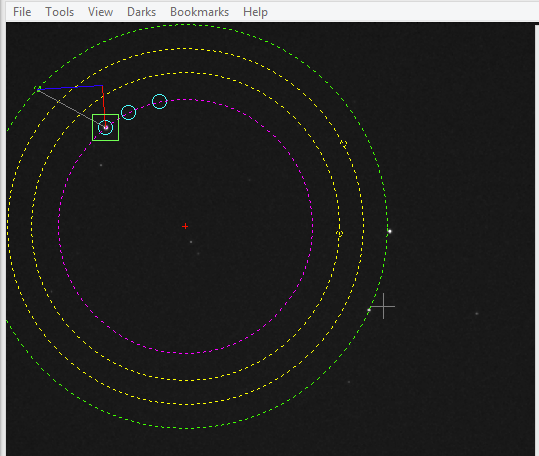
Using the Polar Alignment Overlay
The polar alignment overlay is placed on the main display once enough alignment points have
been collected.
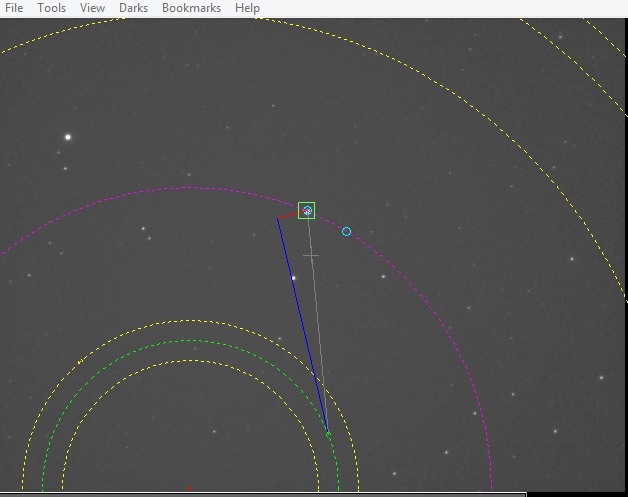
- The center of the display is indicated with a grey +.
- The Center of Rotation is indicated with a red +.
- A magenta circle shows the orbit traced by your reference star.
- A green circle shows the desired orbit of your reference star when the polar alignment
is accurate.
- Yellow circles show the orbits of the other reference stars.
Within each of the green and yellow orbits, a small circle indicates where the star
should be located. A grey line connects your reference star to its target
circle on the green orbit. These positions are dependent on the guide star being
correctly identified.
A blue line shows the azimuth correction needed to move the reference star and a red line
shows the altitude correction required.
To make the adjustment lines easier to see, the orbits can be shown or
hidden with the ‘Show Orbits’ option.
Adjust your altitude and azimuth knobs to move your reference star to its
target circle. Adjusting in altitude moves the reference star along the red line.
Adjusting in azimuth moves the reference star along the blue line. As an alternative,
you can position three reference stars on their respective orbits.
This is important when using manual mode.
To get the most accurate alignment, adjust the ‘Hour Angle’
till the stars on the main display are all offset by the same amount and direction
from their target circles. Then make your adjustments.
To confirm, you can redo the process. You may need to adjust your declination to keep the
polar region centered if you had to make large adjustments. You may also want
to return the mount to the start position if you have limited visibility.
When finished, click ‘Close’. If you made large adjustments you may want to
re-calibrate.
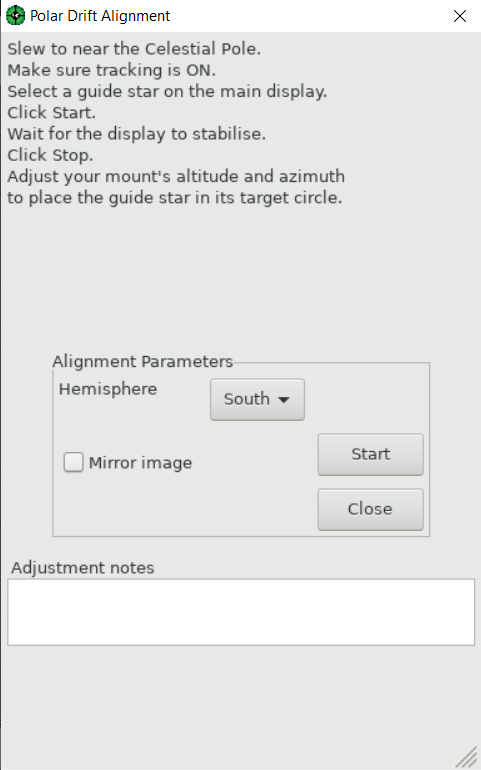
PHD2 Polar Drift Alignment Tool
The Polar Drift Alignment tool operates on a similar principle to the
original Drift Alignment tool.
The difference is that the drift is measured near the celestial pole to
calculate the adjustments needed
in both Azimuth and Altitude at the same time. However, it becomes
less accurate as the distance of the
drift star from the pole increases. Also, it may take some time for the
adjustment to settle so Static
Polar Alignment can be faster. The main advantages of Polar Drift
Alignment are that any star can be chosen, the tool only needs
to know which hemisphere you're in and it does not need PHD2 to be calibrated
first.
To get started, perform the following steps:
- Connect PHD2 to your camera
- Manually adjust the mount’s RA axis to point within 5 degrees of the apparent pole, then
slew the telescope to point to Dec = +90 or -90. On a German equatorial mount, it’s best to start with
the mount in the counterweight-down orientation, pointing at the pole.
- Check that your hemisphere is correctly identified and adjust if necessary
- If your camera image is mirrored e.g guide camera on an OAG, tick Mirror image
- Select a suitable guide star on the main display
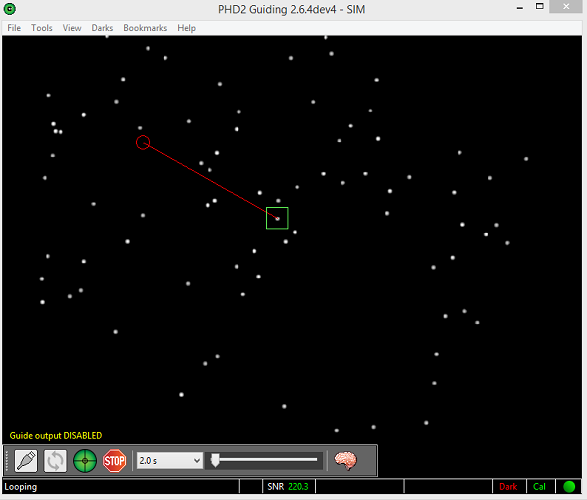
Click the ‘Start’ button to start the drift.
You will soon see a red line appear on the main display. This shows the adjustment needed on the guide star
to minimise the drift. At first it will move around a lot until it settles onto a stable adjustment.
When it has settled, click the ‘Stop’ button. The adjustment will remain on the main display.
Adjust the altitude and azimuth knobs to move the guide star into the red circle at the end of the red line.