Trouble-shooting and Analysis
General Guide to Resolving Problems
The
field experience with PHD2 since its initial release in 2013, involving
thousands of users worldwide, has shown that 99% of what people
think of as "guiding problems" are not really that at all.
Instead, they
usually come from two sources:
1) Operational errors made by the user
2) Mechanical problems with the mount or the physical equipment riding on the mount
It's
important to remember this when you encounter difficulties and can't
get the results you want. Operational
mistakes can be avoided by carefully studying the documentation on the
PHD2 web site (or in this built-in Help), following the steps described in the "Best
Practices" document, and using the 'search' tools on the PHD2 support
forum. YouTube videos, unless done by someone close to the PHD2
project, have wildly variable quality, often reflecting misunderstandings and sometimes producing a witches'
brew of good and bad advice - so be careful what you watch. One
of the most common mistakes is to
wildly change the PHD2 guiding parameters in a futile attempt to
correct for mechanical problems that exist in your setup.
This only makes things worse. The default guiding parameters
calculated by PHD2 reflect the parameters you entered in the
new-profile-wizard, so they are already adjusted for your setup. You
should be able to get reasonable results
out-of-the-box if the equipment behaves and if you don't, you are
probably dealing with operational mistakes or mechanical
problems. Although it is
frustrating to
be confronted with mechanical problems, it is important to isolate,
identify, and understand them before trying to fix them or
mitigate their effects. Mechanical problems won't simply go away.
Even if they temporarily subside, they will inevitably come back to bite you. And
something that worked fine just last week or even last night may no
longer work - that is the nature of hardware.
PHD2 or any
guiding software is often the messenger of bad news because of the
incredible level of accuracy required for guiding. Modern guide
cameras are capable of measuring movement on scales of just a few
microns - as a comparison, a human hair is about 50 microns thick.
Until you have tried guiding, your equipment setup has probably
never been
tested or measured at this level of accuracy even by the manufacturers.
Beginners are often in denial about mechanical problems because
the
scope and mount apparently slew well enough, they seem to track the sky
reasonably well, various planetarium applications can move them without
complaint, and they look and feel well-made. Even worse, they were
expensive! But none of this matters when you're trying to get the
full assembly of equipment to track the sky, hour after hour, horizon
to horizon, with
sub-arc-second accuracy. Fortunately, most mechanical problems
can be eliminated or reduced fairly easily or at least without great
financial expense. Most vendors are willing to help with the
problems so long as they have been carefully documented and
demonstrated - and PHD2 is an excellent tool for doing that. For
most people, the cost of eliminating problems comes from time spent
doing trouble-shooting, lost imaging opportunities, and general
frustration; but these problems are part of the hobby
and most successful imagers have learned how to work
through them.
If
you're unfamiliar with the kinds of mechanical problems commonly found
with telescope mounts, you can get a quick introduction here: Common Mount Problems
Also, many problems can arise from the way the imaging-related gear
is attached to the main scope and mount - guide scopes, camera
attachments, cable routing schemes, etc. When these components sag,
drag, or move around on their own, they create unwanted guide star
movements that masquerade as tracking problems in the mount. If you're
unhappy with your overall guiding results, you should proceed in a
careful and systematic way to identify the sources - flailing around in
the dark is a recipe for failure. Here is a quick blueprint for
trouble-shooting:
1. Be sure the parameters you entered in the
new-profile-wizard were accurate - guide scope focal length, mount
guide speed, and the camera pixel size if you had to enter it manually.
If you find mistakes, don't try to fix them manually - just re-run the
new-profile-wizard.
2. Be sure you have reliable camera operations
that deliver consistent, reasonable-looking images of the sky. If you
have problems in this area, follow the procedures in the Camera Timeout and Connection Problems.
3.
Be sure the guide camera is well-focused and you aren't getting
frequent lost-star messages when using 2-second guide camera exposures.
Tips for getting a good focus are discussed here: Star Profile Tool . If you're using imaging and guide cameras from the same manufacturere, be sure PHD2 is connected to the right one.
4.
Get a reasonable mechanical polar alignment, one that is within about
10 arc-min of the celestial pole. Doing this requires mechanical
adjustments of your mount or wedge - you will be loosening fasteners
and cranking knobs to get this done, it can't be done by software
alone. You can use a polar alignment scope, a high-powered eyepiece,
another app that assists with polar alignment, or one of the polar
alignment tools in PHD2. Great precision isn't required, "close
enough" is "good enough".
5. Concentrate on getting a usable
calibration in PHD2, one that doesn't generate error messages or
"alert" warnings. If site conditions allow it, calibrate with the
scope pointing in a declination range of -20 to +20 degrees and a right
ascension (hour angle) that keeps the scope pointing well above the
east and west horizons. If you have visibility restrictions at your
site, come as close as you can to the above goals. If you get error
messages (failed calibrations) or you see alert messages at the top of
the display, follow the advice shown here: Calibration Problems.
It's important to get workable results in this step because the
calibration is fundamental to all the guiding activity that will follow.
6. Use the Guiding Assistant
tool to examine how your mount tracks and behaves working on its own,
without guiding. Use the GA to measure the declination backlash and
once the measurement session has finished, apply the recommendations
you'll be given. If you see large, abrupt guide star excursions or
other inexplicable results during the GA session, resolve those
problems first.
7. Perform a series of 15-20 minute guiding sessions, still in the same region of the sky. Do NOT modify any of the guiding parameters attempting to make things better.
8.
Use the PHD2 LogViewer tool to analyze your results and develop a
strategy for fixing the problems that have been revealed. You can get
help doing this on the PHD2 support forum.Large/Abrupt Guide Star Deflections
Most
users eventually encounter situations where the guide star appears to
make a large, abrupt excursion away from the lock-point. The
great majority of these problems arise from neither the mount
nor PHD2's guide commands. Instead, they usually come
from unwanted mechanical movement in the gear that is riding on
top of the mount, especially the guide camera/guide scope assembly.
This is especially true if the large deflections occur in
declination because the Dec motor is normally idle except for executing
the very short, relatively infrequent guide commands it receives.
The unwanted mechanical movement usually comes from several
sources:
- Tiny movements of the various components in the
guiding assembly as a result of the changing gravitational forces while
the mount tracks the target object
- Dragging, binding, or snagging of cables, especially those that are connected to the guide camera
- Wind gusts or less commonly, effects from camera filter changes, auto-focusing, or mirror movement
- Use of mount features for backlash compensation - these should not be used with PHD2 guiding
Before
rejecting these things as likely sources of problems, think again
about the tiny measurement scales and tolerances described in the
previous section. With many guiding set-ups, a movement of only 5
microns can create an apparent tracking error (guide star deflection)
of over 6 arc-sec, the equivalent of many star diameters. Every
mechanical interface, every set-screw, every movable element has the
potential to shift or move on its own by these tiny amounts. Even
when cables have been routed in a purposeful way, they may bind or pull
in certain sky positions or after a meridian flip. Cable ties or
ribbed plastic cable guides hare small protrusions that can briefly
catch on stationary parts of the mount. For large Dec
deflections, it's easy to determine if these things are coming into
play. Just use the PHDLogViewer tool to zoom in on the time of
interest and see if the deflection was immediately preceded by a
correspondingly large guide command in the direction of movement.
In most cases, you will find this didn't happen. It can
sometimes happen at the beginning of a guide session if you're using
PHD2 Dec backlash compensation, but those events should disappear
quickly. If the abrupt deflections occur in RA, the analysis is
less straightforward because the RA motor runs continuously. But
even then, unusually large, randomly space deflections are more likely
to arise from the sorts of mechanical problems described here than from
errors in the RA drive system.Camera Timeout and Download Problems
In some cases, you may experience
problems where guider images aren't downloaded or displayed. In extreme
cases, this may even cause PHD2 or other camera-related applications to
be non-responsive (i.e. to "hang"). This is nearly always due
to hardware, camera driver, or connectivity issues, with one of the most
common culprits being a faulty USB cable or device. It is highly unlikely
to be caused by an application like PHD2, so you should begin your
investigation at the lower levels of the system.
To help detect these problems and
avoid “hangs”, PHD2 uses a camera timeout/retry mechanism. This timeout
value is set in the Camera tab of Advanced Settings and uses a default
value of 15 seconds. This means that PHD2 will wait up to 15 seconds after
the expected completion of the exposure to receive the image from the
camera. This is a very generous amount of time and should work well for
most cameras. When the timeout occurs, PHD2 will automatically disconnect the
camera and try to re-connect. An alert
message at the top of the screen will advise you of the timeout event and
whether the reconnection attempt was successful. Regardless of whether the reconnection
succeeded, you have a hardware problem of some kind that needs attention.
Here is an approach you can use to
reproduce and then identify the problem:
Make sure you are running the latest
version of PHD2 – often a development version – and the latest versions of the
camera drivers. Some of the camera
vendors issue frequent software changes that must be matched by corresponding
changes in the software libraries used by PHD2.
When these updates aren’t backward compatible, you have no choice but to
run the latest versions of everything.
Confirm that the guide camera is basically
functional - try using a short, direct cable from the camera to the computer
and taking exposures with the native or test application that came
with the camera.
Repeat step 2 but use PHD2 as the
application. You can do this in the
daytime by just connecting to the camera and looping 1-2 second exposures for a
reasonably long time. The PHD2 display
will often be all-white in daytime operation, but as long as the looping
continues with no error messages, things are going ok. If you see problems in this step, it doesn’t
mean it’s a PHD2 problem – it isn’t. The
difference is that PHD2 is using the camera in single-exposure mode whereas
most other apps use it in video streaming mode.
The single-exposure mode involves more back-and-forth data traffic with
the camera and can expose timing problems in the drivers.
If you can’t trigger a failure in
step 3, add the imaging camera into the mix.
Use your imaging application to loop exposures in parallel with what
PHD2 is doing. This will help expose
traffic and bandwidth problems in the USB system.
If no problems occur in step 4 over
extended time periods, use the same USB cables and host computer that you were
using when you first encountered problems.
If you’re already doing this, you need to consider other possibilities:
- The problem may be
temperature-related – perhaps it occurs in colder nighttime conditions but not
during the daytime.
- The OS may be suspending one or more
of the USB ports for power-conservation.
This has become a more common problem with Windows 10 and later releases. Use the Windows device manager and find all
the entries that refer to a USB “hub” or a USB controller. For each of these entries, open their properties
dialog and click on the ‘power management’ tab.
Disable any permissions that allow the OS to suspend the device for
power management reasons.
- Make sure the power source on your
test computer matches that of the computer you use for imaging. Both should be running on A/C power at this
point.
- The problem may be triggered by
loose cable connections on either end – the cables should not lose connectivity
if the cable is moved around as it will be during imaging.
When you can replicate the timeout
problem, the first place to look is the USB cable followed by the other USB
components on your system. Sources of
USB-related problems include the following:
- Low-quality or slightly damaged USB
cables - in recent years, some of the camera vendors have started shipping
low-quality USB cables with their cameras so you shouldn't assume the one you
got with the camera will work. It’s also important to remember that we
work in a hostile environment while imaging, and many of the components we
use were not designed for cold, outdoor conditions. If you regularly tear down
and reassemble your gear, the flexing of the cables can damage low-quality
conductors. So something that worked just last week or last month may no longer
be reliable. High-quality USB cables
with 24AWG conductors and lengths no greater than 15 feet are recommended.
- USB-2 cameras and cables plugged in
to USB-3 ports - those combinations are supposed to
be backward-compatible but that’s only at the hardware level, the driver
implementations can be adversely affected.
- USB port suspension by the OS (step
5b above)
- Marginal power delivery to the guide
camera - your main imaging camera probably has its
own power supply but other devices like the guide camera are typically powered
via the USB cable. Particularly with laptops and inexpensive computers,
you may want to try using a powered USB hub to deliver power to the camera. This approach may also be required when
operating in cold conditions or when using cables of maximum length.
If you can’t isolate the problem at
this point, there are a few other places to look:
- Use a Microsoft tool (USB View) for mapping the
tree structure of USB ports and USB controllers.
- Try choosing ports that will keep your
imaging and guide cameras on separate USB buses.
- Try using a different camera
driver. Many vendors supply both an
ASCOM and a native driver, so try the one you haven’t been using. It’s not uncommon for some of the ASCOM
drivers to lag the native drivers in terms of bug fixes and compatibility
- See if the problem is related to
overall USB bandwidth and try to reduce the total USB usage:
a. Throttle the USB usage limit of the
imaging camera if possible – many of the drivers allow that.
b. Bin the guiding camera unless that
will result in an image scale greater than 6 arc-sec/px.
c. Use sub-frames in PHD2 if the camera
driver supports that.
d. Don’t run other processor-intensive
applications while imaging and don’t allow any of the planetarium applications
to poll devices and other applications at high rates.
Calibration and Mount Control Problems
If
you are just starting to use PHD2
or are connecting to new equipment
for the first time, you may have trouble getting calibration
done. The best way to minimize this risk is to use the Calibration Assistant, and beginners are strongly urged to do that. Calibration problems generally take one of two forms: 1) outright
failures of the calibration because the mount didn't move far enough in
RA and Declination or 2) cases where calibration completes but the
results are suspect. Both types of results are shown by Alert
messages at the top of the PHD2 window. For the situation where
the calibration fails, there are, again, two likely reasons:
- Mount/connectivity problems or operational mistakes: These are the most common sources of the problem. The best tools for trouble-shooting them are the
'Manual Guide' dialog or the Star-Cross test, both under the 'Tools' menu and described in the Tools
section of this help document. Simply use the directional
controls in the 'Manual Guide' window to send commands directly to the
mount while watching a star in the image display window. Use
fairly large guide pulse amounts - at least several seconds - so you
can clearly see if the mount is moving. Try to move the mount
in all four directions and verify the target star is moving by roughly
equal amounts. If the mount does not respond, you know you have
either
hardware or connectivity problems to resolve - nothing to do with PHD2.
Operationally, you cannot complete a calibration if you're pointing
close to the celestial pole or if the mount isn't properly initialized,
un-parked, and tracking at the sidereal rate. If you're using a
Shoestring device to connect to
the mount,
watch its indicator lights to see if the commands are reaching it.
Similarly, your ST-4 compatible guide camera may have indicator
lights to show when guide commands are being received. If you're
using an ASCOM connection to the mount, be sure the COM port
assignments are correct and you've selected the correct ASCOM mount
driver for your equipment. You can use some of the
ASCOM-supplied tools like POTH to be sure the ASCOM driver is
communicating correctly with the mount. It is best to use the
latest version of the ASCOM driver for your mount to insure
pulse-guiding support is complete.
- Incorrect calibration step-size:
If you've used the
new-profile wizard and have provided correct values for focal length,
camera pixel-size, and mount guide speed, the "step-size" used
in calibration should
already be correct. You should confirm this, however, because beginners
frequently enter incorrect values for these parameters. If you've
defined or modified your profile by hand (a bad idea)
or have changed guide speed settings in the mount, you may need
to adjust the 'calibration step-size' parameter in the 'Guiding'
tab of Advanced Settings.
The help content there describes how this parameter is used, and you
should be able to resolve the problem quickly. But if you've used
the new profile wizard carefully and are seeing problems with too
little or no guide star movement, the problem probably lies elsewhere.
Calibration Sanity-Checks and Alerts
It
is also possible that the calibration process will complete but PHD2
will post a calibration alert message saying that some of the results
are
questionable. Again, the likelihood of getting these alerts will be
minimized by using the Calibration Assistant (CA). Even if alerts
are triggered while using the CA, you will get a more specific
explanation of what problems occurred during the calibration. In any
case, the alert messages do not mean
that the calibration failed or is unusable, but they are warning you
that some of the results don't look quite right. Such a "sanity check"
dialog will show an explanation
of the issue and some details of the calibration results:
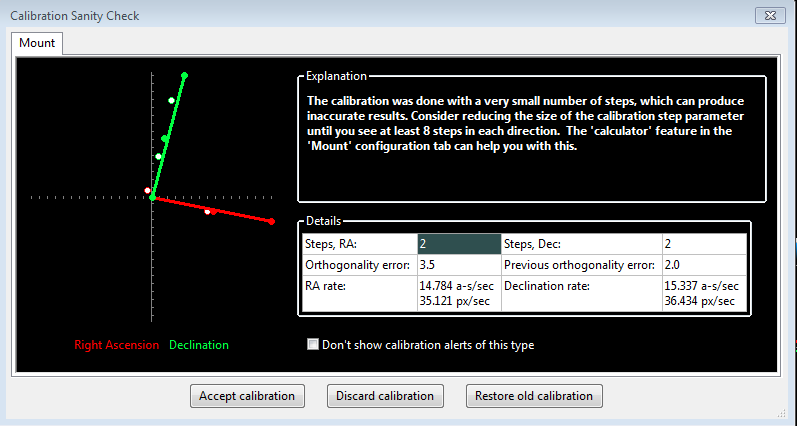
There are currently 4 things checked by PHD2 as part of calibration:
- Too
few steps
(shown above) - resolving this issue can be easy assuming the
mount is actually working correctly.
Just adjust the calibration step-size downward until you get at
least 8 steps in both the west and north calibrations. If you
used the new profile wizard to set up your configuration, a good
starting value for calibration step-size will already be set. In that
case, the alert suggests you entered parameters incorrectly in the
new-profile-wizard or the mount guide speed has changed. You
should check these things and make sure they're right. If
you find that the number of steps in RA and Declination are
substantially different, you are probably seeing evidence of
declination backlash unless you are using different guide speed
settings on
the two axes.
- Orthogonality error - the camera axes are normally computed independently even
though they should
be perpendicular. The angle calculations do not require
great precision, but if they are significantly non-orthogonal, you
should repeat the calibration. If you see repetitive alerts of
this type and the axes are significantly non-orthogonal, you need to
identify the problem and fix it. Common causes are
bad polar alignment, large declination backlash, or large periodic error in RA. Any of
these problems can cause the guide star to move significantly on one
axis while PHD2 is trying to measure its motion on the other axis. If
you suspect these problems, go ahead and accept the calibration, then
run the Guiding Assistant to measure your polar alignment error, declination backlash,
and RA tracking error. In other cases, the mount
may not be moving at all, and the measured
displacements of the star are just caused by seeing effects.
This sort of problem should be obvious in the calibration graph
at the left of the dialog. If the axis error is relatively small
and you are convinced the
hardware is working properly, you can avoid further alerts of this type
by setting the
option to 'Assume Dec orthogonal to RA' in the 'Guiding' tab of the
Advanced Settings dialog. But you should do this only if the error is
fairly small - otherwise, you are simply ignoring a serious problem.
- Questionable RA and Dec rates - assuming the guide speeds reported by the mount are
accurate, the measured guide rate for right ascension should be
related
to the declination guide rate by approximately a factor
of cosine (Declination). In other words, the apparent RA
rate gets
smaller as you move the scope closer to the pole. PHD2 won't try
to identify
which rate is incorrect - it is simply alerting you that something
looks wrong with the rates. You can sanity check these rates
yourself quite simply. If you are guiding at 1X sidereal rate,
your declination guide rate should be approximately 15 arc-sec/sec;
with a guide rate of 0.5X sidereal, the declination rate would be 7.5
arc-sec/sec,
etc. A declination rate that is significantly smaller than the RA
rate is often an indication of substantial declination backlash.
Using a calibration that triggered this alert can lead to
over-shooting in Dec guiding because the actual guide rate is probably
larger than the measured one. To work around this problem, you
should manually clear the Dec backlash before starting calibration.
You can do this in either of two ways: 1) make sure the mount's
last slew direction was north or 2) use the hand controller to manually
move the mount north ('up' arrow) at guide speed for 10-20 seconds.
- Inconsistent results - if the calibration results are
significantly different from your last-used calibration, an alert
message will be generated. This may happen because you've made a
change in your configuration. That doesn't imply a real problem,
but you should probably consider creating a separate profile for the
new configuration. By doing so, PHD2 will remember settings
for each of your profiles, letting you switch between them easily.
If you haven't made a configuration change, you should determine why the results are so different.
With
any
of these alerts, the relevant data field will be highlighted based on
the
type of message. You can choose to ignore the warning ('Accept
calibration'), re-run the calibration ('Discard calibration'), or
restore your last good calibration ('Restore old calibration').
With the third option, you can defer calibration until later and
start guiding with your last good calibration data. If you see
repeated alerts on the same topic and are convinced there really
isn't a problem, you can use the 'don't show' checkbox to block
future alerts of that type. But you should be aware that the
sanity-checking used by PHD2 works well for a wide range of equipment,
and most users don't see these calibration alerts at all.
Declination Backlash
The
most common source of calibration problems is declination
backlash, which is present to some degree in most geared mounts.
Backlash can occur when the direction of motion on the axis is
reversed. The telescope may not immediately start moving in the reverse
direction, even though the motor is turning. The usual cause is loose
meshing of the gears in the drive train. With many less-expensive
mounts, it may take several seconds for the axis to start moving in the
correct direction and this can lead to poor calibration and
guiding results. Consider the
following
example of a calibration review dialog:
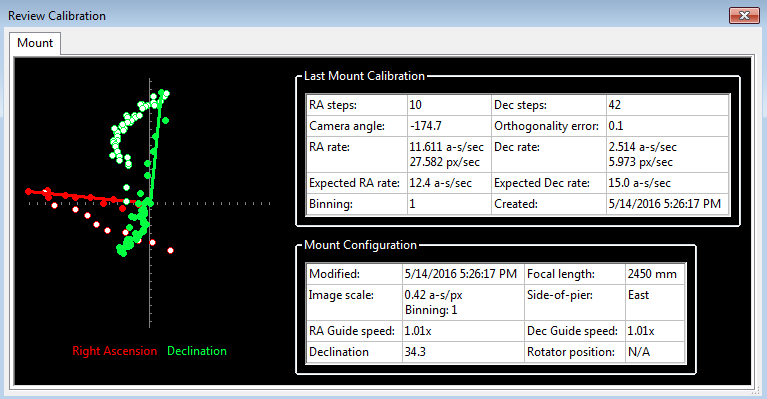
The
first clue to the problem is found by comparing the number of steps
required for calibration on the two axes - 10 for RA but 42 for Dec.
This shows the mount was not moving consistently in
declination, probably because the backlash had not been cleared. This also explains the "wandering" behavior
of the declination points (light green) when the guide commands were
reversed from north to south. Finally, the computed declination rate is
much smaller than the RA rate even though the guide speed settings on
the two axes were identical. In fact, this would have triggered a
calibration alert dialog.
There are
actually two problems to be addressed here. First, the
calibration result is poor and should be repeated in order to get a
more accurate measure of the declination guide rate. Second, the
mount is likely to behave badly during direction reversals in
declination even if the dec guide rate is correct. The
calibration can be improved by taking these steps:
Start
looping guide camera exposures on a field with usable stars, preferably
near Dec=0 and within 15 degrees of the celestial meridian
Using the hand-controller, move the mount north ('up' arrow) until you see the stars in the display moving
Start the calibration
Once
this is
done, most of the declination backlash in your mount should have been
cleared and you will probably get better results from the calibration.
The underlying backlash problem generally requires some
mechanical adjustment
to the mount. If the mount isn't using a guide speed close to
1x sidereal, you can probably get an immediate improvement by
increasing the mount guide speed. You can also try using a
PHD2 backlash compensation setting,
but this is not likely to work well if the backlash is large -
more than 3 seconds, for example. If you can't correct
the
backlash or reduce
it to manageable levels, you should consider choosing uni-directional
guiding for declination. To do this, you determine
which way the mount drifts due to polar alignment error and tell PHD2
to guide only in the opposite direction (see Uni-directional guiding). This is controlled by the 'Dec
guide mode' control on the'Algorithms' tab of the Advanced Settings dialog.
For example, if the
mount tends to drift north overall, restrict guide commands to
south-only. This is not an ideal solution, obviously, but you can
still use reasonably long exposures and achieve good guiding results
- many imagers choose to use this approach.
Validating Basic Mount Control - the Star-Cross Test
If you are having repeated
problems getting calibration to complete without alert messages, you
should run a very simple test to see if the mount is responding to
guide commands. This test basically mimics what is done during
calibration, but it is more direct and can give you a better feel for
what's going on. We'll call it the "star-cross" test. The
idea is to open the shutter on the main imaging camera, then send guide
commands that should cause the stars in the field to trace out a
distinctive cross pattern. In other words, you want to get an
image that looks something like this:
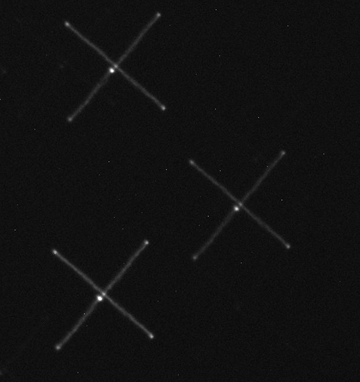
The angular orientation doesn't matter, that's just a function of how you
have the guide camera rotated. What is important is that the
lines in the cross are perpendicular and have roughly equal lengths in
each of the four directions relative to the starting point in the
center. If the image you get doesn't have this approximate
appearance, guiding will either be impaired or perhaps impossible.
For example, consider the following poor result:
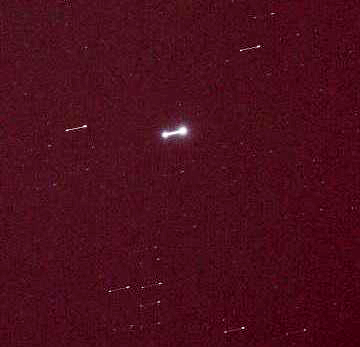
You
can see the star has moved along only one axis - only
in right ascension in this example. The declination guide
commands sent to the mount did nothing at all. Until this is
fixed in the mount, you won't be able to guide in declination at all
and will have to disable declination guiding to even complete a
calibration. There are many other permutations of bad
results, each suggesting a particular problem in the mount, the guide
cable, or much less likely, the ASCOM driver for the mount. You
can safely assume it has nothing to do with PHD2.
Here are the steps for running the test manually:
- Set the mount guide speed to 1X sidereal. Bring up
the 'Manual Guide' tool in PHD2 and choose an initial value for 'Guide Pulse Duration' - start with, for example, 5 seconds.
- Start a 60 second exposure on the main camera.
- Send
a 5-second pulse west, then two 5-second pulses east, then a final
5-second pulse west. This should return the star to its
approximate starting position. You should wait about 5
seconds after sending each guide pulse to give the command time to
complete before sending the next pulse.
- Now send a 5 second pulse north, then two 5-second pulses south, then a final
5-second pulse north. This should again return the star to its starting position.
-
Wait for the main camera image to download and see what you get.
You
can use different pulse lengths if you want, perhaps using smaller
values to confirm the mount will respond to them. Just be sure
the total exposure time on the main imaging camera is longer than the
total of guide durations plus a margin for error. On most mounts,
the star will not return to its exact center because of some
declination backlash - you can see that in the first example image. But
it should be fairly close or you'll need to look more carefully at how
much declination backlash you have in the mount. PHD2 also has a Star-cross Tool that will automate these steps for you.
One benefit to
using this test is that it reduces things to the absolute basics: will
the mount move as directed or not. It has nothing to do with PHD2
guide settings because they aren't involved in the test. You may
find it helpful to use the test results to communicate with the mount
manufacturer or other users who understand your type of mount and its typical problems.
Measuring the Mount's Behavior
If you're having trouble
getting decent guiding results, your first instinct will probably be to
try making wild changes to the guiding parameters in the hope of
finding a magic solution. This almost never works, and you're
more likely to just make things worse. If the default parameters
from the new-profile-wizard aren't producing reasonable results, the
fault is probably with the hardware and you'll need to determine the
underlying cause. Once you understand the cause, you can probably
improve your guiding results even if no actual repairs can be made -
but understanding the underlying problem is important. To
understand what the mount is doing, perform the following steps:
1. Use the new-profile-wizard to create a new equipment profile for the test, being sure the guide scope focal length and camera pixel size are correct. Don't guess at them, look them up if you aren't sure.
2.
Use an ASCOM connection to the mount if one is available and set the
mount guide speed to 0.5x - 1x sidereal. Disable any backlash
compensation you have in the mount.
3.
Use 2-second exposures and let PHD2 auto-select a guide star near Dec=0 with the scope pointing at least
45 degrees above the east and west horizons to minimize seeing effects.
4. Run the
Guiding Assistant for 10-15 minutes and apply whatever recommendations
it makes, particularly with respect to min-move values. Let it
measure your declination backlash. You may need to use a large
tracking region to avoid losing the guide star during this part of the
process - just be sure there aren't multiple stars in the tracking
rectangle. The backlash test will move the star a long distance
north, so choose a guide star that is nearer the southern edge of your
camera frame to give yourself plenty of room.
5.
Watch how things are going during the GA session. If you bump the
mount or something really unusual happens, stop the test and then
restart it. The goal is to measure the performance when things
are running normally.
6. Do not change any of the guide parameters beyond what is recommended by the Guiding Assistant.
7.
Take a careful look at the results shown in the Guiding Assistant
table. Each entry in the table can tell you something useful
about the mount's performance. These results are also written to
the guiding log, so they are available for later analysis.
8.
If you got calibration alert messages in step 3, you should probably
remedy those problems before proceeding. Guiding with a bad
calibration is not likely to produce good results. Also, if your
polar alignment error is 10 arc-min or more, you should improve on that
and then repeat the above steps.
9. Let PHD2 guide for another 10-15
minutes, just letting it run as long as there aren't gross errors from
wind or other "mistakes." Do NOT change any of the guiding parameters while this is being done.
If
you want to analyze the results yourself, use the PHDLogView tool and
the tutorial on "Analyzing PHD2 Guiding Results". You should also
consult the document on PHD2 Best Practices. All of these
references are available on the OpenPHDGuiding.org web site under the
'News' tab. If you'd like some help understanding the results,
post both the guiding and debug log files on the OpenPHD2 Google forum
and we'll be glad to help you out.
Lost-Star Events
When PHD2 can't locate the primary guide star in a camera frame, several things happen:
- The
screen will flash and a "beep" tone will sound. The sound can be
disabled if you wish (Advanced Settings/Guide tab) but the screen will
always flash
- No guide commands will be issued and the next guide camera exposure will be started
- Lost-star event messages will be sent to any imaging applications that are connected to PHD2
- Lost-star
messages will be displayed in the status bar including the reason for
the loss - low SNR, low HFD, low-mass, or mass-change
Lost-star
events occur when the object in the search region no longer meets the
criteria for identification as a star. It may no longer be bright
enough, meaning that its SNR or its total brightness ("mass") are too
low. Or it may look too much like camera sensor noise, meaning
that its size (HFD) is lower than your setting for Min-HFD. If
you are using "star-mass-detection" as a way to discriminate between
mutliple similar stars in the search region, a lost-star event will be
triggered if the star mass value changes by more than the allowed
amount. This feature is generally unnecessary for current
versions of PHD2 and can be disabled. In any case, the first
steps in trouble-shooting will be to understand the reason for the
lost-star events and whether they happened because of degraded sky
conditions, mechanical tracking errors, or inappropriate star selection
parameters. For beginners, a common cause of lost-star events is
poor focus of the guide camera, and you should insure that your guide
camera remains well-focused using the procedures described in the Star
Profile tool section. Star Profile Tool
PHD2 doesn't invoke any sort of extended
guide star recovery process - it simply keeps taking exposures and
looking to see if the guide star reappears within the current search
region. This works well for brief or intermittent problems like
clouds, wind gusts, or sporadic mechanical problems but it assumes that
the tracking accuracy of the mount is sufficient to keep a guide star
within the search region for a reasonable length of time. As the
elapsed time of the lost-star events grows, the mount will slowly drift
off-target and a star that re-appears in the search region at a much
later time is probably a different star. In this case, PHD2 will
resume guiding but the original astronomical target will no longer be
centered and may not even be in the field of view. Recovery from
extended lost-star periods is the responsibility of the end-user or the
imaging automation application, not PHD2. Doing the recovery
properly requires re-slewing the scope to its original sky pointing
position, a procedure that PHD2 is not equipped to do.
Alert Messages
PHD2
will sometimes display alert messages at the top of the main display
window. These generally show error or diagnostic information that
warrant your attention. During normal operation, you probably
won't see any of these, but if you do, this section can help you decide
what to do about them.
Dark-library and Bad-pixel Map Alerts
"Use a Dark Library or a Bad-pixel Map"
- using a dark library or bad-pixel map reduces the likelihood that
PHD2 will mistakenly identify hot pixels or other sensor noise as
a star. If you choose to ignore this message, you'll be
vulnerable to situations where PHD2 inadvertently switches from the
guide star to a hot pixel and no longer guides correctly.
Format/geometry mismatches
- dark frames and bad-pixel maps must match the format of the sensor in
the camera being used. If you've changed the camera in an
existing profile, the existing dark/bpm files will not be usable and
you'll see this alert message. To avoid seeing the message,
you should
instead create a new profile when you change cameras. You'll still need
to shoot new darks or bpms, but you can keep the old files for use with
the original camera. You might
also
see a
format-incompatibility alert message if you have mistakenly connected
PHD2 to the wrong camera - this is a particular risk when your guiding
and imaging cameras come from the same vendor. You can completely
specify the camera you are using for guiding in the Connection
Dialog Specifying camera ids . Unless you're
connected to the wrong camera,, you should rebuild the dark library or
bad-pixel
map from scratch - more information can be found here: Dark Frames and Bad-pixel Maps
ASCOM Alerts
When
you first connect to a mount, camera, or other ASCOM-controlled device,
you may see an alert message saying that a required capability is not
supported by the driver. One example would be lack of support for
pulse-guiding by an ASCOM telescope/mount driver, something that can
occur with outdated drivers. In these situations, your only
recourse is to update the ASCOM driver. These drivers are
generally available from the ASCOM web site or, in some cases, from the
device manufacturer. As
a rule, the best practice is to use the latest versions of these
drivers so you don't encounter problems that have already been fixed.
You might also see other alert messages associated with the ASCOM driver for the mount:
1.
"PulseGuide command to mount has failed - guiding is likely to be
ineffective." This is usually caused by a bug or timing
sensitivity in the ASCOM mount driver, and there is generally no way to
know if the guide command was executed properly or not. If
you rarely see the alert and your guiding results are acceptable,
you can probably ignore it. Despite the alert condition, PHD2
will continue to issue guide commands, so you don't need to take any
immediate action. If you see the alert frequently, you should
send us your debug log so we can help you communicate the problem to the author of the ASCOM driver.
2.
"Guiding stopped: the scope started slewing." This is pretty
self-explanatory, but the determination that the scope was slewing is
something reported to PHD2 by the ASCOM mount driver. Whether it
was actually slewing isn't known to PHD2. Assuming you didn't
mistakenly slew the scope with guiding active, there is probably a
timing problem in the driver. If you want to sidestep the problem
temporarily, you can disable the logic to check for slewing - go into
the 'Guiding' tab of the Advanced Settings dialog, and un-check the box that says
"Stop guiding when mount slews." This will let you continue
guiding, but the results might be suspect. The debug log should
provide the details needed to describe the problem to the author of the
ASCOM driver.
3.
"Mount is reporting invalid guide speeds." Some new drivers don't
follow the standards and report nonsense guide speeds, often
because they aren't using the correct units of degrees/sec. When this
occurs, PHD2 will treat the reported guide speeds as "unknown" and will
ignore them. This degrades the accuracy of the PHD2 PPEC guide
algorithm and otherwise reduces the effectiveness of calibration review
and other diagnostic tools. This is not a PHD2 problem, it must
be fixed by the author of the driver.
Camera Timeout Alerts
Alert messages associated with camera timing/timeout problems are discussed above: Camera Timeouts
Calibration Alerts
A number of alerts may appear during the mount calibration process. These are described here: Calibration Alerts
Maximum-Duration Limit Alerts
During
normal guiding, you may see an alert message saying that your settings
for maximum-duration limits in RA or Dec are preventing
PHD2 from keeping the guide star locked. If you've decreased
these parameters from their default values, you should restore them. However, if the limits are well above one
second,
this alert probably indicates you've encountered a mechanical problem
that needs to be corrected. In the simplest cases, you may have
suffered a cable snag, wind gust, mount bump, or other external event
that caused the guide star to move by a large amount. In such
cases, you simply need to correct the problem if you can and proceed
with guiding. But in other cases, the alert may be triggered by a
steadily growing guide star displacement that is not being corrected at
all.
For example, if PHD2 can't move the mount correctly in either the
north or south directions, the cumulative uncorrected error will
eventually reach a point that triggers the alert. Or you may be
encountering "runaway" Dec guiding because the setting for 'reverse Dec
output after meridian flip' (Advanced Settings/Guiding tab) is incorrect.
These sorts of
problems will require some diagnosis and simply
increasing the maximum-duration limits will not help.
Display Window Problems
New users often complain
that the image displayed in the main window is extremely noisy or is
almost all-white or all-black. Assuming the camera is
functioning and actually downloading images, the display issues are
often caused by the absence of any usable stars in the frame. For
example, trying to test the camera indoors or in daylight will almost always create
these conditions. The appearance of the image display window in
these situations provides no useful information and should be
discounted. PHD2 uses an automatic screen-stretching function
that is intended to help you see real stars under a nighttime sky.
When no stars are present, the display will be stretched to show
the range of minimum-to-maximum brightness values of whatever is in the
frame - which is often nothing at all. This is usually what
causes the noisy/all-white/all-black display results. You may
also encounter display problems if the guider is not well-focused.
Focusing the guider can be a tedious process
but it's critical to getting good guiding results. A good
technique is to start with a bright but unsaturated
star and try to reach focus with that. Then move to successively
fainter stars to fine-tune the focus position using the PHD2 Star
Profile tool to measure the size of the guide star. Good results
can also be obtained using a Bahtinov focusing mask or focusing tools
in other applications. It doesn't matter what you use, but just
trying to judge focus by looking at the display is not likely to
produce a good result.
Hot-pixel and Star-Selection Problems
With most guide cameras, you can encounter problems where
clumps of hot pixels are mistaken by PHD2 as guide stars. This
can be especially troublesome if you're using automation tools and
the 'auto-select' guide star selection is mistakenly choosing hot pixels. For many cameras, a
simple dark frame will suffice for reducing or eliminating hot-pixel
problems, and dark frames should always be used as a starting-point.
But for other cameras, you will need to build a bad-pixel map and
update it as necessary when you see changes in the locations and sizes
of defective pixels. Camera sensors change over time and may
react to changing temperatures, so bad-pixel map maintenance is a small
task you should be willing to perform. Step-by-step instructions can
be found in the Bad-pixel map
chapter of this document. These problems are different from
transient hot pixels, which can be caused by cosmic ray strikes on the
sensor. Although cosmic ray hits can disrupt guiding, there's
really little you can do about them.
Since
the recommended practice is to let PHD2 choose the guide star
("auto-select"), you should use the available UI controls to help PHD2
do the best possible job. The Minimum-HFD property on the Guiding
tab of the Advanced Settings dialog is probably the most
effective tool for
avoiding hot-pixel selection. You should set its value to
allow use of the smallest and faintest real stars your setup can
produce. You should use the Star Profile tool to measure a
reasonable sample of legitimate guide stars for your system. Then
set the Minimum-HFD value to accept those stars while rejecting smaller
bright spots that are really just sensor defects. At the other
end of the scale, you should also specify the brightest
pixel value your system will deliver - the ADU value that represents
saturation. By doing this, you will prevent PHD2 from rejecting
stars that have a flattened profile but aren't really saturated. The
saturation control resides on the Camera tab of the Advanced Settings
dialog and
is part of a control group labeled 'Star Saturation Detection'.
Choose the option for 'Saturation by Max-ADU value', then set the
value for your system. If you have an 8-bit camera, saturation
will be around 255, while a 16-bit camera will saturate around 65000
ADUs. If you don't know the correct value, you can just point the
scope at a bright star, use a multi-second guide camera exposure, and
again look at the Star Profile window. One of the things you'll
see in that window is the 'Peak Value' - that's the ADU value for the
brightest pixel and will tell you whether your images are 8-bit
or 16-bit.. Using both of these controls is likely to produce
much
better results for PHD2 guide star selection.
Restoring a Working Baseline
Despite advice to the contrary, you may have made rapid, uninformed
changes to your guiding parameters only to find the performance stayed
the same or even got worse. Before proceeding, you should restore the
settings to their default values. If you used the
new-profile-wizard to build your profiles, the parameters will have
been set based on the specifics of your configuration, and they are
likely to be pretty close. If you encounter significant
guiding problems using those settings, you are probably having
issues with the mount or other hardware. Blindly changing guiding
parameters almost never solves these problems and quite often makes
things worse. You have several options for restoring the settings
to their default values:
- On the 'Algorithm' tab of the
Advanced Settings dialog, you can individually reset parameters by looking at
the tool-tip for each field. Hover your mouse cursor over the
field and the default value will be displayed. Note that this is
not accurate for the min-move settings, which depend on your image
scale. This approach is best when you want to restore only a few
settings.
- Click the 'reset' buttons on the 'Algorithm' tab for
the selected RA and Dec guide algorithms. This is the recommended
approach for resetting all the guiding parameters. The min-move
settings will be reset to the values originally calculated by the
new-profile-wizard. If you subsequently adjusted those settings
by running the Guiding Assistant, you should repeat that process.
- Run the new-profile-wizard, accessed by clicking on the 'Manage Profiles' button in the 'Connection' dialog.
Use the same camera and mount choices you already have and give
the profile a new name. If you want to re-use the dark library
and bad-pixel map from the old profile, connect to the new profile and
use the 'Darks' menu to import those files from the old profile.
Once you are satisfied with the new profile settings, you can
delete the old one.
Poor Guiding Performance
Once
you've gotten everything running, you will probably get reasonably good
guiding results almost immediately. You will have to decide what
"good enough" means, and everyone's standard is likely to be different.
But if you find your imaging results are not acceptable
because the stars are streaked or elongated, you'll need to take a
systematic approach to correcting the problems. It is often
tempting to just start blindly adjusting the various guide parameters
in an effort to make things better. There is nothing wrong with
adjusting the parameters - that's why they're there - but it should be
done carefully based on an understanding of what they do and what problem you're trying to solve. The
PHD2 default settings are carefully chosen to produce reasonable
results for most amateur equipment and locations. Optimal
settings are entirely dependent on the image scale, seeing conditions,
and behavior of your specific mount. In other words, they are
unique to your situation - there is no magic "red book" of correct
guiding parameters, and settings you get from other users may be
completely irrelevant to your situation. If you got started by
using the new-profile-wizard, the default settings will already be
tuned fairly well to match your image scale. By using the Guiding
Assistant, you can get more specifics about your situation - how the
seeing conditions look and how you might adjust the minimum-move
settings to avoid chasing the seeing. You can also use either the
Guiding Assistant or the Manual Guiding tool to see how much backlash
is present in your mount, something that can be important to understanding your declination guiding results.
Log Analysis
Any
sort of problem isolation or tuning will invariably require use of
the PHD2 log files. Both are formatted for straightforward
interpretation by a human reader, and the guide log is constructed to
enable easy import into other applications. As mentioned in the
'Tools' section, applications such as PHDLogViewer or Excel
can
be used to visualize overall performance, compute performance
statistics, and examine time periods when guiding was problematic.
With Excel or similar applications, simply specify that the guide
log uses a comma as a column separator. That said, PHDLogViewer
is strongly recommended for log analysis and is the tool used by the
developers to provide support on the PHD2 Google forum.
Guiding Log Contents
The
contents of the guiding log will continue to evolve as new capabilities
are added. But the basic content is stable, and considerable care
is taken to not "break" applications that parse it. If you wish
to analyze the log yourself, the following information will be helpful.
The PHD2 guide log will contain zero or more sequences of
calibration and zero or more sequences of guiding. Each of these sections has a
header that provides most of the information about the guiding algorithms being
used and the internal parameters used by PHD2 for guiding. At the start of either a calibration run or
a guiding sequence, the last line of the header information defines a set of
column headings. The meanings of those
columns are shown below:
Calibration columns:
- dx, dy
are offsets from the starting position, in pixels, in the camera coordinate
system
- x, y are the camera x/y coordinates of the guide
star at the end of each calibration step
- Dist is the total distance moved in the camera
coordinate system (dist = sqrt(dx*dx + dy*dy).
This is the value used by PHD2 to compute the calibration parameters
Guiding columns:
- dx, dy are the same as for calibration - offsets
from the "lock position" of the guide star in the camera coordinate
system
- RARawDistance and DECRawDistance - these are the
transforms of dx and dy into the mount coordinates - in other words, they use
the arbitrary angle of the guide camera to map from X/Y on the camera to RA/Dec
on the mount
- RAGuideDistance and DECGuideDistance - these are
the outputs from the various guiding algorithms. The guide algorithms operate on the
"raw" distances and decide how far, if any, the telescope position
should be adjusted in each axis. For
example, with a "minimum move" parameter set, the "guide"
distances can be zero even when the "raw" distances are non-zero.
- RADuration, RADirection, DECDuration, DECDirection
- these are the values determined by the two "guide" distances
above. The "durations" are the
lengths of the guide pulses, in milliseconds, needed to move the mount by the
distances specified by RAGuideDistance and DECGuideDistance
- XStep, YStep - step-adjustment durations for the
adaptive optics device if one is being used
- StarMass - a brightness measure of the guide
star image
- SNR
- an internal "star-detection ratio" used by PHD2 - essentially a
measure of how well the star can be distinguished from the sky
background
- ErrorCode - an integer value representing the quality of the guide star measurement:
- 0 - no error
- 1 - star is saturated
- 2 - star has low SNR
- 3 - star mass is too low for accurate measurement
- 4 - star HFD is below Min-HFD value
- 5 - star HFD is above Max-HFD value
- 6 - star has drifted too near the edge of the frame
- 7 - star mass has changed beyond the specified amount (only if mass-checking is enabled)
- 8 - unexpected error
All distance values are in units of pixels. The header for the guiding section will show
the image scale as it is known by PHD2, and that can be used to scale the pixel
distance values into units of arc-seconds if desired.
Problem Reporting
If
you encounter application problems that are specific to PHD2, you
are encouraged to report them to the open-phd-guiding Google group: OpenPHDGuiding Group
You need to first establish a membership in the group in
order to get help. Obviously, the more information you can provide
about your problem, the more likely
we will be able to resolve it. Using the following
guidelines will help in that regard:
- Try to reproduce the
problem - if we have a clear set of steps to follow, we are more likely
to find a solution quickly. If you can reproduce it, try to
reduce things to the minimum number of steps. Remember, we won't
have your hardware or computer environment when we try to reproduce it
ourselves.
- Try to be complete about describing your configuration - operating system, equipment types, PHD2 version, etc.
- Upload the PHD2 log files from the session in which you encountered the
problem - this is a critical step. Use
the 'Upload log files' function on the 'Help' menu to do this -- it
gives you an easy way to select the relevant log files and then uploads
them to our server without constraints on file size. Attaching log
files to forum messages is discouraged and will often not work at all
because of the file sizes. If you can't reproduce the problem,
try to
estimate the
time of day when you first saw it - this could help us find evidence in
the debug log without having to sift through hundreds of lines of
output. If you request help on the forum without uploading your
log files, you will usually be asked to do so, thus adding an
unnecessary delay in getting help.