Dark Frames and Bad-pixel Maps
Introduction
Cameras
used for guiding are typically not temperature-regulated and may
produce images that appear quite noisy. This is particularly
true of older CCD-based guide cameras. As a result, guide
exposures frequently show obvious defects in the form of hot
(or "warm") pixels or regions with spurious brightness levels.
For convenience, we refer to these areas of sensor noise as "hot
pixels" but they may be larger than 1 pixel in size and have arbitrary
brightness levels. If
there are too many of these defects, PHD2 may have trouble identifying
and selecting guide stars. This is especially true when sky
conditions are poor and there are few or even zero actual guide stars
available. The "MinHFD" and "MaxHFD" settings provide the best defense
against mistaking sensor noise for stars, but a dark library or
bad-pixel map provides an extra level of protection. Even after
guiding has begun, a
spurious hot pixel close to the guide star can disrupt the calculation
of the guide star position and may cause the guiding to "jump"
between
the real star and the hot pixel. These sorts of problems can be
mitigated by using either of two approaches in PHD2: dark frames or
bad pixel maps. All functions related to dark frames and
bad-pixel maps are located under the top-level 'Darks' menu.
Since
the dark libraries and bad pixel maps rely on raw ADU values returned
by the camera driver, they are implicitly dependent on camera
settings that affect these ADU levels. These include the camera
bit-depth and the camera gain. Bit-depth is the term used to
indicate whether the driver returns image data in 8-bit or 16-bit
format. Even though some camera electronics may use 10, 12, or
14-bit values internally, the image data will be scaled and delivered
to PHD2 as 16-bit data. Many cameras operate in only one bit-depth
mode, in which case you don't need to think about it. But some
guide cameras support either mode and you will need to choose or
at least be aware of which mode is active before building a dark
library or a bad-pixel map. If you subsequently change bit-depth
settings, you will need to repeat the process of building them.
The camera gain setting is a bit different in that it scales
the ADU levels in an arbitrary way. Small changes in gain are
unlikely to have much effect on the dark library/bad-pix map data but
large changes will invalidate them. For this reason, we
discourage people from making frequent adjustments to the camera gain.
Dark Frames
PHD2 will
build and use a library of dark frames that match the range of
exposures you use for guiding. Once the library is built, it will
be saved automatically and will be available for use across multiple
PHD2 sessions. As a result, you can spend a modest amount of time
to build a good dark library, then use that library for an extended
period of time. Once you have connected to your camera, you can
build a dark library from the 'Dark Library...' item under the
top-level 'Darks' menu. That will start a dialog that looks like
this:
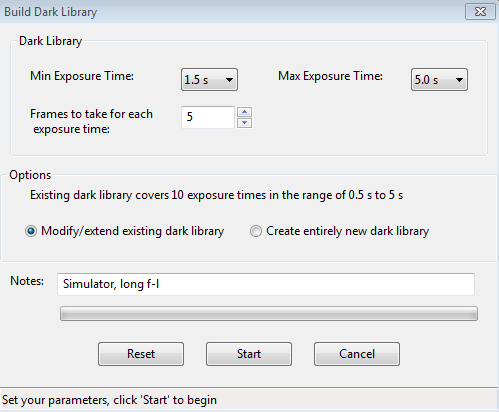
You
use the two controls at the top to specify the minimum and maximum
exposure times that will be used to acquire dark frames. The
starting, ending, and intermediate values match the exposure times used
in the main PHD2 window, so you can acquire dark frames that will match
any exposure time you choose for guiding. The third control
specifies the number of dark frames that will be acquired and averaged
for each exposure time. The averaged image is referred to as a
"master dark frame." Historically, PHD has used 5 dark frames for
this purpose, but you may want to increase that number to improve the
quality of the master dark frame. You can also add a note or
comment if you wish - this will be embedded in the header of the master
dark frames for later reference.
The
two radio buttons above the Notes field let you specify whether you
want to modify/extend your current dark library or build a new library
from scratch. If you've gotten alert messages saying the dark
library must be rebuilt, you should choose the 'Create entirely new
dark library' option. This insures that all of the master dark
images match the format of the camera you're currently using.
Otherwise, you can simply refresh or expand the current dark
library by taking new dark frames at the specified exposure times
Once
you've set your
parameters, click on 'Start' to begin the process. If your guide
camera does not have a shutter - most do not - you'll be prompted by
PHD2 to cover the guide scope. To get the best results, be sure
there is no light leakage into the guide camera - doing this in
daylight is not likely to work well. PHD2 will systematically
work through the range of exposure times you've chosen, taking the
specified number of frames for each exposure time. Progress will
be displayed on the status bar at the bottom of the window. Once you've started the
process, the 'Cancel' button above will change to a 'Stop' button.
You can click on this if something goes wrong or you want to
change the parameters before the entire sequence completes.
Stopping in this way will discard whatever data has already been
collected, so you'll need to make your corrections and then restart the
process. Once all the frames have been collected, PHD2 will
compute the master dark frames, store them in a dark library data file,
then show a message box summarizing the results. If your
camera has no shutter, you'll also be prompted to uncover the guide
scope so you can return to normal imaging.
Once your dark
library has been built, you control its use by the 'Use Dark Library'
item under the 'Darks' menu. The checkbox on the menu item
will toggle on or off each time you click on it. The setting of
the item is retained across program executions, so if you choose to
leave the menu item checked, PHD2 will automatically load the dark
library and resume its use the next time you run the application.
The dark library itself is retained on disk until you build a new
library, so you can freely change the setting on the 'Use Dark Library'
menu item without loss of any data. If you are using a dark
library and there is no master dark frame that exactly matches your
guide exposure time, PHD2 will use the nearest fit. However,
you should use matching master dark frames for best
results. If you have a dark library that has missing exposure
times, you can simply acquire the missing data and it will be added to
the existing dark library - there is no need to start over. By
changing the setting of the 'Use Dark Library' menu item, you'll be
able to see the effect of using the dark library and determine whether your guider images are sufficiently improved.
Remember
that a dark library is associated with a particular camera and binning
level. PHD2
will check to be sure that the dark library matches the camera you are
currently using. If it does not, you will see an alert message
telling you the dark library can't be used and must be rebuilt.
This can happen when you've changed cameras inside an existing
equipment profile, something you shouldn't do unless you have upgraded
your guide camera and have no plan to return to using the old camera.
The dark library also depends implicitly on the camera gain
level, so you should rebuild the dark library if you've made a
significant change in camera gain - also something you really shouldn't
do once you've gotten familiar with the camera behavior.
Bad-pixel Maps (Defect Maps)
For
some guide cameras, dark frames don't do an adequate job of removing
the defective pixels that are visible in the guide frame. In
those situations, you can probably get better results by building and
using a bad-pixel map. This approach directly measures and
compensates for specific areas of the sensor that produce false signal
(hot/stuck pixels) or don't respond correctly to incoming light (cold
pixels). Such a "map" is created by taking a sequence of
comparatively long dark exposures (e.g. 15 seconds), averaging them,
then statistically analyzing the resultant frame to identify the
locations of defective pixels. These pixel locations are saved
for future use. During normal guiding, each of these pixel
locations on the guide image is replaced by a statistical sample of the
surrounding pixels, thus eliminating all or most of the effect of the
"bad" pixel. The final result is usually an image with a smoother
background and fewer obvious defects. For any defects that
remain, PHD2 also provides a way to manually click on
bad pixel locations and add them to the map. This entire process
of obtaining and analyzing dark frames is handled for
you by PHD2, so it's easy to build a bad-pixel map.
Building
a bad-pixel map is done by clicking on the 'Bad Pixel Map...' item
under the top-level 'Darks' menu. If you are doing this for the
first time, you will be prompted to obtain a sequence of dark frames
for analyzing your camera sensor and building the map:
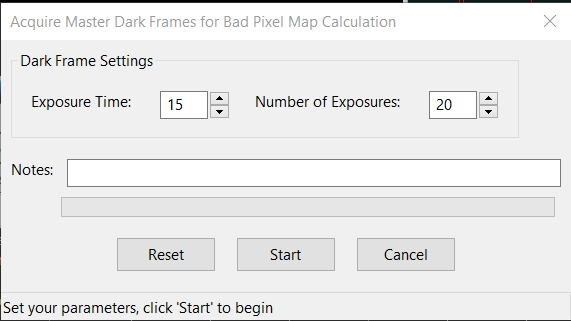
This
is a slightly different version of the dialog used for obtaining dark
frames, described in the previous section. Because the analysis
is based on statistics, you should use relatively long exposure times
(> 10 sec) and at least 10 frames. Since the bad-pixel map can
be re-used for fairly long time periods, you won't have to repeat this
operation very often, and it's worth spending some time to get higher
quality data.
Once
the dark frames have been captured, PHD2
will compute the statistics and identify an initial set of defective
or suspect pixel locations. After a short delay,
you'll then
see a dialog that looks something like this:
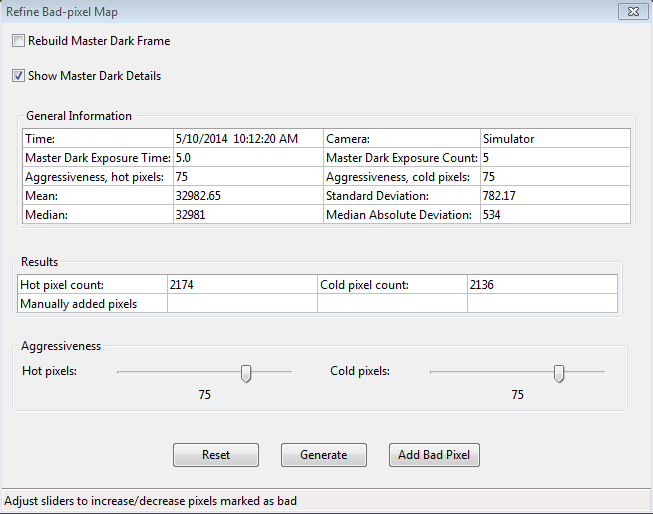
The
'General Information' section shows a summary of the statistics
computed by PHD2 during the identification of bad pixel locations.
Normally, you won't need to look at these, and you can hide this
portion of the display by clearing the 'Show Master Dark Details'
checkbox. The "Results" group shows the counts for hot and cold
pixels based on the current settings of the two "Aggressiveness" sliders
below them. If you're doing this for the first time, the
aggressiveness sliders will be set at their default values, 75 within
the range of 0 to 100. You'll need to experiment or make some
judgment about whether the counts look reasonable based on what you see
on your normal guide frames. If you adjust the aggressiveness
sliders left and right, you'll see the hot and cold pixel counts
change. The sliders control how "aggressive" PHD2
should be in identifying suspect pixels and flagging them as being
defective - so higher aggressiveness settings will result in higher
pixel counts. Once the settings are where you want them, click
on the 'Generate' button to compute and load the new defect map.
At
this point, you'll probably want to examine the results. The main
window of PHD2 is still active, so you can take a normal guide exposure
to see how things look. If you want to quickly see the result of
using the defect map, just toggle the 'Use Bad-pixel Map' menu item
under the 'Darks' menu. Keep in mind that you don't need to
achieve a perfectly smooth, black background in the guider image - you
just need to have a sufficiently small number of remaining hot/cold
pixels that neither you nor the PHD2 guiding algorithms will mistake a
bad pixel for a star. If you over-correct with very aggressive
settings, you may create so many bad pixel areas that they interfere
with detection of usable guide stars. It's easy to make
adjustments with the sliders - just change the slider settings,
click on 'Generate' again, and look at the results in the main PHD2
window.
You
may find this approach still leaves some hot pixels that you'd like to eliminate. Since the
default approach relies on statistics and needs to apply to a wide
range of cameras, it isn't a "fire-and-forget" operation - you will
often need to fine-tune it using the steps below.
Step-by-Step Guide to Refining a Bad-pixel Map
The following steps are recommended for refining a bad-pixel map to control pixel-level artifacts in your camera:
- Cover the guide scope and start looping 5-second exposures
- Open
the Refine Bad-pixel Map window (Menu/Darks/Bad-pixel Map), then drag
it to the side of your screen so you can see both the BPM and guiding
windows
- Adjust the gamma slider in the main window until you
can see the hot pixels - this may require a brighter image than you are
accustomed to seeing
- Select the option "Show defect pixels."
With the box checked, red dots will appear for any hot pixels
that are already known.
- Slowly drag the hot-pixels
aggressiveness slider left and right until most of the hot pixels are
covered by a red dot, with a much smaller number (or even zero) hot
pixels not covered. Click the 'Generate' button
- Now pick up the remaining hot pixels by manually adding them to the bad-pixel map
- Un-check the "Show defect pixels" checkbox
- Select a hot pixel in the guiding window by clicking on it
- Click on 'Add bad pixel' in the BPM window
- Repeat as necessary until you satisfied most of the bad pixels have been handled
- Close the BPM window - DO NOT click 'Generate' again because that will undo the manual pixel selection
Once
your bad-pixel
map has been built, you control its use by the 'Use Bad-pixel Map'
item under the 'Darks' menu. This setting is retained
across program executions, so leaving it checked will tell PHD2 to
automatically load the defect map and use it for all guide exposures.
The settings for 'Use Dark Library' and 'Use Bad-pixel Map' are
mutually exclusive - you can use one or neither, but not both at
the same time. As with the dark library, the bad-pixel map data
file is stored permanently, so you can disable its use without losing
any data. Both of these data structures can be used for extended
time periods, but it's worth remembering that camera sensors do change
over time. As a result, you may want to rebuild the dark library
or bad-pixel maps at periodic intervals or when you start to see a
degradation in the appearance of your normal guide images. In
these cases, it is also advisable to click on the checkbox for 'Rebuild
Master Dark Frame', which will tell PHD2 to reacquire the underlying
dark frames and recompute a baseline bad-pixel map. You'll then
need to refine the map as you did before until you're happy with the
results. There is no reason you should need to interact with
either the dark library or bad-pixel map data files, but you can find
them located in the 'AppData\Local' logical directory used by your
operating system.
Like dark libraries, bad-pixel maps are associated with a particular camera and binning level.
PHD2 will check to be sure that the bad-pixel map matches the camera
you are currently using. If it does not, you will see an alert message telling you the bad-pixel map can't be
used and must be rebuilt. This can happen when you've changed cameras
or binning factors inside an existing equipment profile, something you shouldn't do unless
you have no need for the old settings.
Reusing Dark Frames and Bad-pixel Maps
If
you're using the same camera in multiple profiles, you may want to
re-use the dark libraries or bad-pixel maps you built for that camera.
This can be accomplished by importing the camera-related data
files into a profile that doesn't already have those files. For
example, suppose you built an original profile - call it Profile1 -
that uses your Lodestar guide camera, and you built both a dark library
and bad-pixel map for it. Some time later, you create a new profile,
Profile2, that has different mount or focal length properties but still
uses the original Lodestar camera. In that case, you would
connect your gear using Profile2, then use the 'Import From Profile...'
menu item under the top-level 'Darks' menu. You would select
Profile1 as the source of the import function for the dark library,
bad-pixel map, or both. You will be shown only those profiles
that have a camera with compatible sensor geometry (sensor size, pixel
size, binning). Clicking on 'Ok' will copy the dark/bad-pixel map files
and will associate them with your new profile, Profile2. Since
they are copies, changing the data files in one profile will not affect
other profiles. Keeping them synchronized, if that is what you
want to do, will require a subsequent 'import' operation.