Using PHD2
Guiding
There are five basic steps to start guiding.
- Open the Connect Equipment dialog by pressing the USB-icon
button and select the configuration profile you created with the New
Profile Wizard. Connect to the camera and mount.
- Pick an exposure duration from the drop-down list.
- Hit
the loop button and look at the available stars, adjusting focus if
necessary. Move the mount or adjust the exposure duration until you can consistently see usable stars.
- Click the 'Auto-Select Star' icon to choose the best guide stars available.
- Press the PHD2
Guide button.
Details of these operations will be described in the sections below.
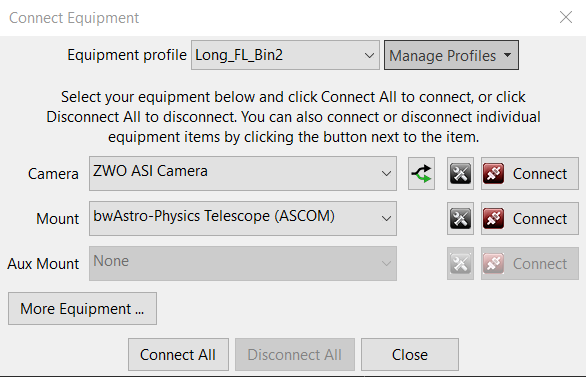
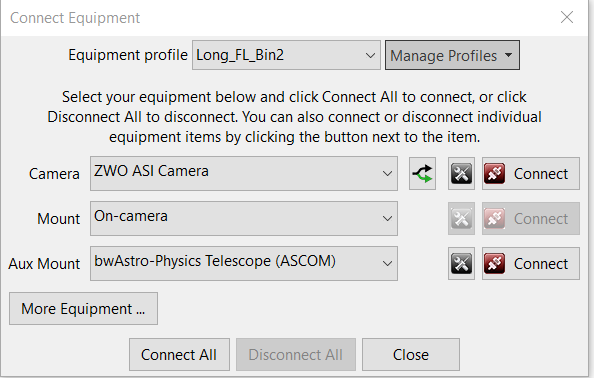
Equipment Connection
In
order to begin guiding, PHD2
must first connect to your hardware: the
guide camera, the mount, and, optionally, an 'aux' mount, an adaptive
optics
(AO) device, and a rotator. When you click on the USB
icon, you'll see a dialog that looks something like this although the
equipment details will differ. The various choices in this dialog
are discussed below.
Equipment Profiles
At the top of
the 'Connect Equipment' dialog are controls for
managing equipment profiles. All of the guider settings in PHD2,
default or otherwise, are automatically stored as part of an equipment
profile. This includes calibration data and the last three Guiding
Assistant reports. The only significant data not stored in the
profiles are the dark libraries and bad-pixel maps which are stored in
the file system. Even so, the dark libraries and bad-pixel maps are
logically linked to each profile. If you have only one guiding
setup - you use the
same
camera and guide scope combination each time - you will only need one
profile. But you
may
have multiple equipment configurations - for example, an
off-axis-guiding arrangement for a long focal length scope and a
separate guide scope/camera configuration for a shorter focal length
imaging scope. The PHD2
guide settings for those configurations will be different, so you should use separate equipment
profiles. The controls at the top of the 'Connect Equipment'
dialog let you choose the profile you want to use and to
create/edit/remove profiles as you see fit. When you select a
profile and connect to its associated equipment, all of the
settings last used with that profile are automatically
reloaded.
Once you've established the profiles you need - perhaps only
the
default one - you can simply click on the 'Connect All' button and
you're ready to move ahead.
If
you already have a suitable default equipment profile and you simply
want to connect to the equipment just as before, you can do a
<shift>-click on the main screen 'USB' button and PHD2
will
automatically re-connect to your hardware. Your profile
information will be retained when you install new releases of PHD2 so
long as you don't first un-install. Un-installing PHD2 is almost
never necessary and will simply create complications - it is not a
useful trouble-shooting step. More information about managing profiles can be found here: - Managing Equipment Profiles
New-Profile-Wizard
The
best way to create a new profile is to use the "Wizard"
capability, and for new users, this is a critical first step. The wizard takes you through a sequence of windows
that explain the various settings and help you decide how to set
them. It will also calculate baseline algorithm
settings that are likely to work reasonably well for your set-up.
Creating a profile this way is faster and less error-prone
than doing it by hand in the 'Connect Equipment' dialog.
When you run PHD2
for the first time on your system, this
wizard will be automatically launched. Subsequently, you can use
the new-profile wizard by clicking on the 'Manage Profiles' field in
the 'Connect Equipment' dialog, then choosing 'New using
wizard...'.
The wizard asks a number of questions that
are important for getting your profile built correctly. The
explanatory text in each pane of the wizard should make clear what is
being asked and what needs to be done. But here are some
additional tips to help you through the process:
1. Connection Options: As
you make selections for the various devices, you will usually see a
prompt
asking if the device is already connected and ready to communicate with
PHD2. If you say 'yes', PHD2 will try to connect and then fill in
some of the data fields with information read from the device.
Saying 'no' simply means you'll have to enter the data by hand.
If PHD2 tries to connect with the device and fails, you'll still
be able to proceed by just entering the data manually.
Device-connection in the wizard is basically a convenience feature that
makes it easier to fill in the fields with accurate values. You
won't see the prompt if PHD2 already knows the device can't return
useful information - for example, if the mount choice is 'on-camera.'
2. Camera connection pane: unbinned pixel size.
If you said 'yes' to the connection prompt, this
information will usually be filled in automatically and the control
will be disabled. If you said 'no' or if the device doesn't
report its pixel-size, you'll need to enter the value by hand.
You should be
able to get the unbinned
pixel size from the camera spec sheet or the manufacturer's web site.
If the pixels aren't square, just specify the larger dimension or
the average value if you prefer. This won't have any
effect on your actual guiding results, but it will allow PHD2 to know
the image-scale for your set-up. This is used for setting
baseline guiding parameters, doing sanity-checks on calibrations,
reporting guiding performance, and getting support on our forum..
3. Camera connection pane: binning level. If
your guide camera supports binning (some do not), you can specify what
level of binning you want to use for this equipment profile. If
you want to use the same equipment set-up with different binning
levels, it's best to create separate profiles for each binning value.
If your guide camera has very small pixels and you have also
specified a long focal length, you may see a 'warning' icon next to the
Pixel Scale field. That is telling you the specified image
scale is probably too small and you should bin the camera if possible.
4. Camera connection pane: guide scope focal length.
This seems to be a common place for mistakes, so it's worth being
careful and getting it right. The correct value is not the
aperture of the
guide scope, it is the focal length.
For example, if you're guiding with a 50mm finder
scope, the
focal length will not be 50mm - it will probably be something closer
to 150-175mm. A 60-80mm refractor guide scope will probably have
a focal
length in the range of 240-500mm, not 60-80mm. Similarly, if
you're guiding with an OAG on your main imaging scope, the focal length
will be that of the main scope. In some cases, you may be using a
small threaded focal reducer on the guide camera, so that must also be
taken into account. Like the pixel-size entry, the focal length
doesn't demand a great deal of precision, but you should get as close
as you can. Otherwise, the performance numbers may not reflect
your actual results and the baseline guiding parameters may be sub-optimal.
5. Mount connection pane: mount guide speed. This is another area that seems to cause confusion. The guide speed is a parameter set in the mount or in the mount driver,
it's not something controlled by PHD2. PHD2 never sets the mount
guide
speed, it only reads it. It is usually expressed as a multiple of
the sidereal rate and is typically in the range of 0.5x - 1x sidereal.
Despite what you may read elsewhere, it's usually best to use
guide speeds in this range rather than much lower speeds. Higher
guide speeds can help to clear backlash more quickly and may help to
overcome stiction problems. If you say 'yes' to the connection
option prompt, PHD2 will attempt to read the current guide
speed from the mount. If this fails for some reason, you'll need
to enter the guide speed manually. PHD2 uses this value to
automatically set the calibration step-size and to aid in checking
calibration results; but the guide speed information is not important
for the actual guiding. If you're using different guide speeds on
the RA and Dec axes, enter the larger value. If you really can't
determine what the guide speed settings are in the mount, leave the
setting at the default value of 0.5X. This pane also has a
checkbox regarding the presence of high-precision encoders in the
mount. These devices are sometimes included
on expensive, high-precision mounts, and you are likely to know if you
have them. Most users will leave this box unchecked.
In
the last pane of the
wizard dialog, you're given two options: 1) To automatically restore
the PHD2 calibration whenever the profile is loaded and 2) to
immediately
build a dark library when the new profile is saved and the wizard
completes. The first
option is only presented if your profile uses an ASCOM or INDI mount
connection.
It is a convenience item especially for users with permanent
setups. You can also use this option if you can insure that the
guide camera orientation in its adapter tube remains the same from one
night to the next. If you're in doubt or don't want to bother
with how the guide camera is oriented, leave the box unchecked.
You should usually select the option to build a dark library unless you
already have a
compatible dark library that you're going to import from a different
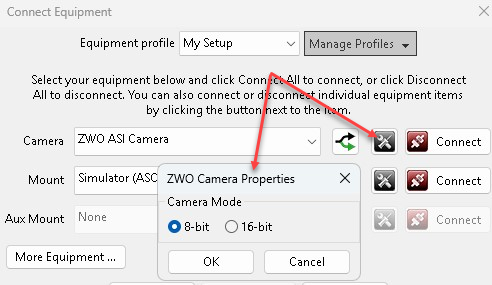
profile. However, if you want to set properties of your guide camera
such as bit-depth (8-bit vs. 16-bit), you must do that before building
a dark library. A dark library can always be built or modified at a
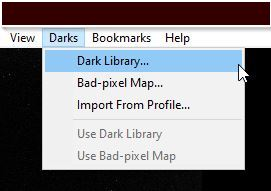
later time using the 'Darks' pull-down menu in the main window. If
you are changing cameras and want to keep the dark
libraries and bad-pixel maps associated with the old camera, you should
create a separate profile for the new camera. When a camera
selection is changed in an existing profile, the previously built dark
library and bad-pixel map data will no longer be usable. That
also applies to using the same camera with different binning values.
Setups using different binning factors should be kept in separate
profiles because
the dark library and bad-pixel maps depend on the binning factor.
Camera Selection
The
Camera drop-down list shows all the camera types natively supported by
PHD2 in addition to all the ASCOM cameras you have already installed.
In all cases, the OS-level drivers for the camera must be
installed correctly in order for PHD2 to connect to the device.
If the camera uses an ASCOM interface, you'll also need to
install the corresponding ASCOM driver for the camera. If you
don't see your ASCOM-compatible camera shown in the drop-down list, you
probably don't have the ASCOM driver installed. Neither the ASCOM nor
OS-level drivers are included with PHD2, so they must be located,
downloaded, and installed separately. For non-ASCOM cameras, the
PHD2 distribution does include the additional application libraries
(SDKs)
needed by PHD2 to use the camera. In some cases, the camera may
have both ASCOM and native interfaces and you're free to choose
whichever you prefer. In some cases, the two different versions
may operate the camera in a slightly different way or expose different
sets of camera properties. The camera vendors update their
drivers and SDKs frequently so you need to keep track of this and keep
your camera drivers current. In some cases, a release update to
PHD2 may require the latest camera driver software so you should
also be aware of that.
It
is not practical to provide an exhaustive list of cameras that are
supported by PHD2. In many cases, camera vendors extend their
product lines by updating their lower-level drivers without having to
change the application libraries used by PHD2. In those cases, we
aren't aware of the changes unless a user reports problems. The
list shown below should be interpreted as follows:
1. If the
camera vendor is completely absent, it is unlikely that the camera is
supported, or it may only be supported using a web-cam interface
2.
If the camera model is shown in the list, it is supported unless
there are unresolved problems with the vendor's drivers
3. If the specific camera model is absent but earlier models are shown, it is likely the camera is supported
4. If the camera uses an ASCOM interface, it is supported
Since
the PHD2 download is free, the simplest course of action is to
install it and see if your camera is shown in the PHD2 drop-down list.
Alternatively, you can check for camera support info in the Wiki on the PHD2 Google forum: https://github.com/OpenPHDGuiding/phd2/wiki/CameraSupport
Finally, you can always post a message on the open-phd-guiding forum
asking if anyone has experience with the camera. Access to the
forum requires a user log-in so you should establish an account in
order to get help with any guiding problems you encounter.
Baseline list of supported cameras:
Windows:
- ASCOM v5/6 compliant cameras
- Altair
- Atik 16 series, color or monochrome
- Atik Gen 3 color or monochrome
- CCD-Labs Q-Guider
- Fishcamp Starfish
- iNova PLC-M
- MagZero MZ-5
- Meade DSI series: I-III, color and monochrome
- OpenCV
- Orion StarShoot DSCI
- Orion Starshoot Autoguider
- Orion Starshoot Planetary Imager and Autoguider
- QHY 5-II
- QHY 5L-II
- SAC4-2
- SBIG
- SBIG rotator
- Starlight Xpress SXF / SXVF / Lodestar
- Svbony
- ToupTek
- Webcams (LXUSB, parallel, serial, OpenCV, WDM)
- ZWO ASI
Mac:
- Fishcamp Starfish
- KWIQGuider
- Meade DSI series: I-III, color and monochrome
- Orion Starshoot Autoguider
- SBIG
- Starlight XPress SXV
- The Imaging Source (DCAM Firewire)
- ZWO ASI
USB
cables and computer ports are typically used to communicate with the
guide cameras. These components can be the source of problems for
a variety of reasons. Inexpensive, poor quality USB cables - even
the ones supplied with the cameras - often have very small conductors
and are therefore prone to being damaged. The connectors and
cables are generally not intended for outdoor use although that's where
we're using them. Finally, Microsoft Windows releases
starting with version 10 will, by default, try to conserve power by
suspending USB ports when the OS senses periods of inactivity.
All of these things can interfere with imaging and guiding
operations and you should be aware of them and devise strategies for
avoiding them. If you encounter these problems, you should
follow the instructions in the Trouble-shooting section - Camera Connection ProblemsSupport for SBIG Dual-chip Cameras
Many
cameras from the Santa Barbara Instrument Group (SBIG) have
two sensors - a primary one for imaging and a second, smaller one
for guiding. While the two sensors are physically separate, they
share electronics inside the camera and more importantly, share a
single USB data link to the computer. This means that
downloading of data from the two sensors must be coordinated - you
can't retrieve a guider image while an image from the main sensor is
being downloaded. Beyond that, Windows will only allow one
application at a time to connect to the camera over the single USB
link. These are physical and architectural restrictions that
can't be circumvented by PHD2. However, it is possible for the
camera-controlling (image capture) application to implement an
interface for PHD2 to get data from the guide chip - essentially,
a "side door" mechanism that won't violate any of the above rules.
With this arrangement, the image capture application is acting as
a traffic cop to coordinate access to the two camera sensors. One imaging
application that does this is Sequence Generator Pro (SGP). If you
use SGP as your main imaging application, you can also use their "SGP
API Guider" module, which allows PHD2 to access the guide chip on the
SBIG camera.
ASCOM Camera Properties
If
you choose an ASCOM camera, you'll also be able to access the ASCOM
setup dialog for that camera by clicking on the properties button
immediately to the left of the 'Connect' button:
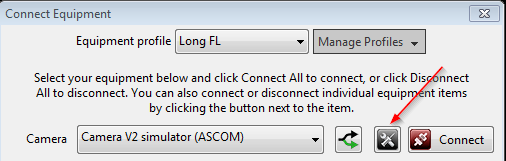
Depending on the camera, this may provide access to properties that are not controlled by PHD2.
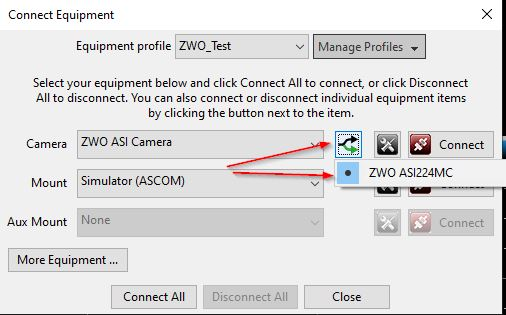
Multiple Cameras from the Same Manufacturer
If
your computer is connected to multiple cameras from the same manufacturer (i.e.,
an imaging camera and a separate guide camera), you'll usually need to specify
which camera should be used by PHD2 and avoid getting it connected to the wrong
camera.
In
order to reduce the likelihood of having this problem, follow these steps when
creating a configuration profile:
- Make sure your camera drivers and ASCOM driver are up-to-date.
- Before running the Profile Wizard, make sure that only the guide
camera is physically connected to the PC. If your guide camera is connected
through the imaging camera’s built-in USB port, you will need to connect the
guide camera directly to the PC.
- If the drivers are installed correctly, you can connect to the camera
in the first step of the Wizard. This will automatically determine your
camera’s pixel size
- At the end of the configuration process, don't try to build a dark
library immediately.
- After the Profile Wizard is finished you will be returned to
the Gear Connection dialog. Click on the camera 'disconnect' button, then
click on the 'branch' button (see below). Even though there will be only
one camera listed, select it anyway. The entry should be the most
accurate identifier needed to choose the camera when using multiple cameras
6. Click
on the 'properties' button to see if you have an option to choose the operating
mode (8 or 16 bit). If so, choose your preferred mode. If you aren’t
sure, 16- bit is generally preferred.
7. Click
Connect to connect the camera in the Gear Connection dialog then click on 'Ok'.
8. Now
use the 'Darks' menu in the main window to create a dark library for the guide
camera in your new configuration (or you can import one from another profile
that uses the same camera.)
Some
camera manufacturers don't do a good job of staying connected to the right
camera and may occasionally switch from
the guide camera to the imaging camera without any notification. If you
see PHD2 alert messages warning you that the camera sensor geometry has changed
and you need to re-build your dark library,
PHD2 has probably gotten connected to the imaging camera. Don't rebuild the dark
library without first checking for this "switching" problem.
These problems are caused by the camera drivers, there's nothing PHD2 can do to
prevent them. One way to be sure you're still connected to the right
camera is to open the 'Stats' window and take some exposures. Scan down
the data table in the stats window and find the entry for 'Image size' - see if
that's the correct size for the guide camera.
If
you continue to have problems with switching between cameras, you can take a
different approach. Use the ASCOM driver for one of the cameras, and the
'native' driver for the other one. Of course, you will have to be sure
that the ASCOM driver is configured to connect to the appropriate camera.
In all cases, you should be sure you're running the latest camera drivers and
the latest release of PHD2 even if that means running the latest 'dev'
release. Some camera manufacturers update their drivers and SDK software
frequently, often without being concerned about backward compatibility.
If PHD2 ends up being connected to the wrong camera, you can
re-assert your choice of camera by clicking on the ‘branch’ button in the Gear
Connection dialog:

Mount Selection
The Mount drop-down list displays options for connecting to
your mount. There are generally two ways to do this:
- Use
an ASCOM-compatible (or INDI) telescope driver that sends guide commands to the
mount over a serial cable (or more commonly, a USB/Serial
connection). This is the recommended approach for the reasons explained below.
- Use
the ST-4 compatible guide port interface on the mount with a
specialized cable and an intermediate device like a camera or a
Shoestring box
The
ASCOM interface relies on third-party drivers to communicate with the
mount. These drivers are available from the ASCOM web site (ASCOM Standards)
or
from the mount manufacturer - they are not distributed with PHD2. So
the drop-down list will be populated by only those ASCOM drivers you
already have installed on your system. If you can't find your mount in the list, you either haven't installed its driver correctly or it only supports ST-4 guiding. The ASCOM driver must
support the 'PulseGuide' interface, which has been a requirement for
ASCOM compliance for many years and is widely supported.
With this type of mount control, guide commands are sent from PHD2 to
the mount over the serial interface. The high-level PHD2 guide
commands (e.g. "Move west 500 mSec") are translated by the mount
firmware into the appropriate motor control signals to execute the
command. With the ASCOM interface, PHD2 can also
obtain the
pointing position of the telescope, especially the declination and side-of-pier, which can
be used as factors in guider calibration and provide greatly improved ease-of-use.
The "Guide-port"
interfaces use a specialized, hardware-level control port available on
most mounts. To use this type of interface, there must be
another
device in the link between PHD2
and the mount:
- Any of the guide cameras which have an ST-4 compatible
"on-camera" guider interface. Use the 'on camera' mount choice for these setups.
- Any of the Shoestring GP-xxx devices
- A supported AO device with a guide port interface
With
this style of interface, PHD2
guide commands like "Move west 500
mSec" are translated by the intermediate device (camera, Shoestring
box, AO) into electrical signals necessary to drive the mount
motor for the correct length of time.
Aux Mount Selection
If
you are forced to use the ST-4 style of guiding in the 'mount'
section, PHD2 will not be able to use that interface to determine the
scope's pointing position. As a consequence, guider
calibration won't be automatically adjusted for declination, nor will
it be automatically flipped when the side-of-pier changes.
You
can restore these features by specifying an "aux" mount connection that
will be used to get the telescope pointing information. An
example is shown below:
For
Windows users, the "aux" mount can use any of the ASCOM-compatible
mount drivers, while Linux users can take advantage of INDI drivers.
The "aux" mount choice will be used only if the primary mount
interface cannot return pointing information - it will otherwise be
ignored. Note: some mounts (e.g. Celestron and iOptron) have a
separate hardware port also labeled 'Aux' - DO NOT USE THIS for
guiding - it is completely unrelated to the 'Aux' connection in PHD2. The
last entry in the list of 'Aux mount' connections is labeled "Ask for
coordinates." This can provide a rudimentary aux-mount facility
if you can't use an ASCOM or INDI connection to your mount. If
you need to pursue this option, you can read about the details here: Ask-for-coordinates.
Most
ASCOM mount drivers use a serial port interface, so the driver
expects to use one of the Windows 'COM' ports. Since most
personal computers no longer have serial port connectors, you can use
one of the USB ports and a USB-serial adapter. Newer mounts may include
such an adapter or have one built in. The software that comes
with the USB-serial adapter will create a software COM port, and that's
the one you'll use with the ASCOM driver. The first time you connect to
the mount with ASCOM (either as 'mount' or 'aux-mount'), you'll need to
tell the driver which COM port to use. That's part of the
driver's setup dialog, and you can quickly open that window by clicking
on the 'properties' icon just to the left of the 'Connect' button in
the above image. Once you've done this, the COM port will be
saved as part of the equipment profile
Benefits of Using ASCOM (or INDI) connections
If
you're running on a Windows platform, you'll probably be better off
using an ASCOM connection for guiding your mount. On other
operating systems, your best choice is likely to be an INDI connection
if one is available. This advice may be contrary to some
old-school experience or folklore on the Web and probably isn't what
you'll hear from the manufacturer of the guide camera. But the
benefits of doing so with PHD2 are substantial, and you should use this
alternative unless you have specific and credible information
against it. Here are some of the primary benefits:
- A drastic reduction in the number of calibrations you'll need to perform. Changing targets will not
require another calibration because PHD2 can know where the scope
is pointing and automatically make adjustments to the guider
calibration. Most users get a good calibration and then re-use
it until they make hardware changes of some kind.
- Automatic adjustment for meridian flips - no need to remember to manually flip the calibration data.
- Automatic adjustment of RA calibration to handle targets in different parts of the sky (declination compensation)
- Elimination
of the ST-4 guide cable as a point of failure - this is a surprisingly
common problem because the cables can be damaged or confused with
similar-looking cables (e.g. telephone cables)
- Elimination of a moving cable that can snag, drag, or bind as the scope is moved around.
- Improved
ability for PHD2 to sanity-check calibration results and warn of
possible problems before you waste hours of imaging time.
- Better diagnostic and trouble-shooting information, which is particularly helpful if you need to ask for assistance
- Availability of scope-slewing options during drift alignment which can further speed the process of polar alignment
A common misconception, sometimes seen on Web forums, is that ST-4 guiding is hardware-based
and thus more accurate or efficient. For any of the modern
mounts you're likely to encounter, this is no longer true - there will
always be software running at each end of the cable, just like ASCOM
guiding. The bottom line is this: if you have an ASCOM or Indi
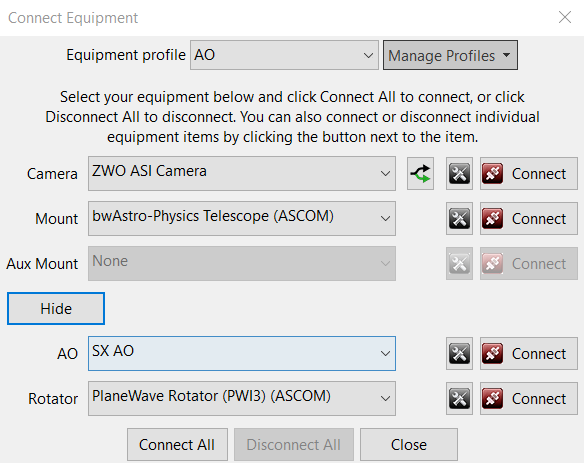
driver available for your mount, you should probably use it. Adaptive Optics and Rotator Selections
With
PHD2, you have the option of controlling the Starlight Xpress
adaptive optics unit and/or any ASCOM-compatible camera
rotator. These can be specified by clicking on the 'More
Equipment..." button in the above dialog:
If
you don't have these devices, just leave the selections at 'None.'
If these devices are connected, you'll see additional tabs in
the 'Advanced Settings' dialog that provide access to various
device-related properties. Adaptive optics (AO) devices generally
require some study before use and you should familiarize yourself with
their operation before trying to use them. Some background
information can be found here: Using an AO .
PHD2 does not control a rotator, but
it will read the current angle setting from the rotator and adjust
the guiding calibration if needed. Rotators are used to control
the orientation of the imaging camera with respect to the sky - perhaps
to keep the orientation the same on opposite sides of the pier or to
create a favorable composition of the objects in the field of view.
If the rotator is part of an off-axis-guider assembly, its
rotation will affect the PHD2 calibration. In this situation,
PHD2 should be connected to the rotator so the calibration can be
adjusted automatically.
The
rotator position is controlled by the imaging application, usually for
purposes of framing the target. In order for PHD2 to make
automatic adjustments to its calibration based on the rotator position,
it has to know the direction of rotation as will any other applications
that use the rotator. By default, PHD2 assumes the
direction of rotation complies with the ASCOM standard, but it may not.
For that reason, there is a "reverse angle" parameter on the
rotator tab of the Advanced Settings dialog. However, most other
applications have similar options, so you need to be systematic about
changing these settings so that all of the software components have a
common view. It's usually best to work through the software components
one at a time starting at the driver level and working up::- 1.
Look at the documentation for the rotator driver (or its controller
software) and see if it has a "reversal" option. If so, choose
the option you want, then leave it alone.
- 2.
Run PHD2 manually, connect to your gear including the rotator, slew to
a star field, set the rotator angle to zero, calibrate PHD2, and guide
until things have stabilized. Stop guiding, then use the rotator
software to rotate the device by 45 degrees. The direction
doesn't matter.
- 3.
Restart guiding and see if things look right - you have a 50% change
they will be. If the guide corrections are wrong:
- a. Stop guiding
- b. On the Advanced Settings/Other Devices tab in PHD2, change the setting for 'Reverse sign of angle'.
- c. Recalibrate PHD2
- d. Restart guiding and let it stabilize.
-
e. Stop guiding, rotate the device again to a new position,
and restart guiding. At this point guiding should be correct.
- 4. Once guiding reacts correctly to rotator position changes, leave the PHD2 'reverse sign of angle' setting alone.
- 5.
Connect your image automation software and repeat these tests. Leave
the previous settings alone, only change, if necessary, whatever 'reverse angle' option is presented in the imaging app.
Simulators
All
of the PHD2
devices -
camera, mount, AO, rotator - include built-in simulators. Don't
confuse these with any of the ASCOM simulators which may be installed
on your system - those will have 'ASCOM' in their names. Although
you can connect to the ASCOM simulators, they don't provide the
necessary feedback to PHD2 for guiding and calibration. As a
result, they're only useful for limited types of testing and
experimentation. But you can use the built-in simulators to
explore how PHD2
works and to decide how you want
to use the program. Virtually all of PHD2's
features, including full
calibration and all the graphical display options, will work properly
when the built-in device simulators are used. You'll even
see fairly realistic guiding performance to give you some idea of what
to expect in the field. To get started using the simulators,
use the new-profile-wizard, choosing 'Simulator' for the camera type and 'On-camera' for the Mount
type.
Remember, the simulators are not
useful for trouble-shooting any problems you encounter with your real
mount and they can't be used for testing your actual hardware. Both the camera and the mount must be real devices in
order to diagnose problems or otherwise get your gear calibrated and
working. In that sense, what you see when using the simulators is
realistic but "fake" behavior. The simulators can be useful in some cases
for reproducing PHD2 application problems, but not for anything having
to do with your actual guiding equipment.
Exposure
Time and Star Selection
The
guide stars are selected while "looping" is active. The best approach is to let PHD2 Auto-select
the guide stars for you by clicking on the 'Auto-Select Star' icon in
the main window. In nearly all cases, it will do
a better job of star selection than you can do manually because it
takes a number of things into account - for example, lack of
saturation, qualification as a "real" star, proximity to other stars
and to the edge of the field, etc. Using the 'Auto-Select'
function is also the only way you can take advantage of multi-star
guiding. If you don't use the
auto-select feature, you can select a guide star candidate by
clicking
on it but that will result in using only that single star for guiding.
After that is done, a green box will
appear to frame the star. If you pick a star that is too
bright (saturated), the status bar will show a red 'SAT'
label and you
should choose a fainter star.
You should adjust the gamma slider to the left to see fainter
stars. Most new users are fooled by this and often choose the brightest
star they happen to see in the field of view. But that choice is
often a saturated star, not a good choice for auto-guiding. In other
words, if you know the name of the star, it's almost certainly too
bright to be used for effective guiding. All
of these pitfalls can be avoided by using the auto-select feature. The
choice of exposure time will
depend entirely on your equipment, sky conditions, and the available
stars. The exposure time you choose has several
implications:
- It
affects the signal strength (brightness) of the selected star - a
brighter star will
stand out better from the background and will generally produce
better guiding results so long as it is not saturated.
- It
also determines the frequency with which guide commands are sent to the
mount - guide commands cannot be sent any more frequently
than once for each exposure cycle. Some mounts need frequent small guiding adjustments while others do not - you may need
to experiment to understand what works best for your situation.
- It
has a strong effect on the sensitivity of the guide algorithms to
seeing conditions. As the exposure time is increased up
through 2-4 seconds, the effects of seeing are smoothed out.
This is particularly
noticeable if you are guiding with a long focal length setup.
Of course, the convenience of using longer exposures must be traded off
against the need for the mount to get sufficiently frequent
corrections. For
mounts that have too many high-frequency errors in RA, you may need to
work with 1-sec or even 0.5-sec exposures in which case using multi-star guiding
becomes even more important. If you're not familiar with the
concept of astronomical seeing, you can get more info here: Astronomical Seeing
As a starting point, try using exposure durations in the range
of one to three seconds. If you want to de-select a star without
choosing another one, you can do a shift-click anywhere on the image display window. If you are just
starting with your
equipment set-up, it's critical that you carefully focus the guide camera. You can use the Star Profile tool
to help with that process or whatever other focusing tool you are
comfortable with - a focusing mask, a camera app like SharpCap, etc.
Just trying to do it "by eye" is rarely going to produce good
results.
If you're using a small guide scope,
like a finder-scope, the focus may react strongly to small adjustments.
It's important to spend the time to get a good focus
because poorly focused guide stars can lead to poor guiding
results.
The
camera exposure control displays
a wide range of pre-set exposure times. Exposure
times smaller than 0.5 second are intended for use with adaptive
optics devices or in other special situations - they are not
recommended for use with typical guide camera set-ups. There is
also a
'custom' exposure option at the bottom of the list that lets you
specify a value not already displayed. Again, this is intended
for special applications, for example where an unusually long exposure
time is
needed.
There is also an Auto exposure time selection available. When exposure
is set to Auto, PHD2 will attempt to adjust the exposure to keep the
selected guide star at a consistent signal-to-noise ratio (SNR) value
while working within the exposure limits you choose.
This is a specialized measurement used by PHD2 to determine how well
the star can be distinguished from the background - it is similar but
not identical to the signal-to-noise ratio used in photometry.
The Auto setting is intended for use in
automated imaging or for AO users who
want to
minimize the exposure time without losing the guide star. Automated imaging involves slewing
and subsequent unattended guide star selection, and failure to
find a bright-enough star will
cause the automated session to fail. In such cases, a "long"
exposure time may be preferable to finding no guide star at all.
The settings to
control
Auto-exposure are on the Camera Tab
of the Advanced Settings dialog.
Multi-Star Guiding and Star-Selection
Most guiding configurations can benefit from guiding on multiple stars
rather than just one. This results in using a
weighted average centroid position of multiple stars rather than just the
centroid of a single star. Multi-star guiding is enabled using a
check-box on the Guiding Tab of the Advanced Settings dialog - one that is "checked" by default. When this option is enabled, the Auto-select
function will identify up to 12 stars in the field of view that have
adequate sizes and SNR values. No more than
9 of these will be used at any one time, but the remainder will be used
to replace secondary stars that are lost or rejected for some reason.
The "primary" star is the single best candidate, the same one
that will be selected if multi-star guiding is disabled. As
guiding proceeds, some of the secondary stars may be rejected because
they are too dim or have drifted outside the field of view. This
is of no concern, the algorithm handles the
secondary list automatically. When multi-star guiding is active,
the PHD2 image display will show the usual rectangle around the primary
star plus circles around the secondary stars. All other UI
features associated with a guide star - brightness properties, SNR,
FWHM, etc - relate to the primary star, not the entire list.
Multi-star guiding can be enabled or disabled while guiding is
active. However, enabling the feature will force another
'auto-select' procedure. The multi-star algorithm uses the secondary
stars to refine the measurements of guide star movement and lower their volatility, so
there is essentially no way for it to degrade guiding performance compared to single-star guiding.
The benefit it provides to your overall guiding
will depend on many factors including image scale, star and background
sky brightness, star size, focus, tube currents, and camera noise. Because of the way the
algorithm is implemented, your best option will be to try it and decide
for yourself. Note: if you don't use the auto-select function and instead choose a guide star manually, multi-star guiding will be inactive.
Since
the multi-star selection and guiding feature was introduced, users have
asked for a means to override guide star selection based on what they
see on the display. These requests have not been acted upon
because they would disrupt the underlying mathematics of the multi-star
algorithm. More importantly, they would lead to inferior results for
reasons described below. The algorithm applies the basic
principle that the accuracy of centroid calculation - the fundamental
calculation of where a star is located on the sensor - is proportional
to that star's SNR. It has nothing to do with the shape of the
star, its location on the sensor, its proximity to the sensor edge, or
any other visual characteristics of the star candidate. The algorithm
will always choose the set of stars with the highest SNR values subject
to user-controlled parameters that define what a star should look like
on a particular system. Two parameters, Min-HFD and Max-HFD,
define a range of star "sizes" that control whether a bright area on
the sensor can be accepted as a star candidate rather than being
rejected as sensor noise, an internal reflection, or a close pair of
stars. The third parameter, Saturation ADU, defines an upper
limit to the peak brightness of a star candidate, usually defined as
the maximum ADU value produced by the guide camera. The algorithm
tries to avoid saturated stars and will accept one only if there are no
other viable candidates. Setting these parameters correctly is
the single most important thing for a user to do in order to get the
best possible sets of guide stars. The "Min" and "Max" HFD values
can be determined empirically by using the Star Profile tool or by
examining the PHD2 guide logs to see the range of star sizes that are
typical for the guiding system and its seeing conditions. Once set,
they should rarely need to be changed unless something in the
configuration or the atmospheric conditions has changed
substantially.
Users
are commonly fooled by what they see on the display and think they can
do a better job of guide star selection. This is a mistaken
impression. The single biggest reason is that many of the
"attractive" guide stars on the display are saturated.
Secondarily, they are often just sensor noise, e.g. hot or warm pixels,
that look like stars once the image has been down-sampled and
gamma-stretched for display. No dark library or bad-pixel map can
completely eliminate these artifacts. In summary, simply squinting at
the screen and clicking on bright spots will produce inferior results
compared to the quantitative, systematic approach taken by the
auto-select star-finding mechanism. Of course, skeptical users
can
still manually choose a guide star, but they won't then be able to use
multi-star guiding. For people who question the auto-selection
process, the debug log file contains a detailed
list, for every auto-find, of the location and properties of
every candidate object in the guide frame and how these were
included
or excluded to compile the final list of usable guide stars.
Automatic
Calibration
Conventional Mounts
Two things need to be measured by PHD2
as part of guider calibration:
- The angular orientation of the camera sensor relative to the right ascension and declination
axes of the mount and the sky
- The length of the guide pulse needed to move the telescope
by a specific amount
PHD2
handles these measurements automatically by sending guide pulses to the
mount and watching how far and in which direction the star moves
between guide camera images. This process begins after you
have
selected a star and then clicked on the PHD2/Guide icon button.
Yellow
cross-hairs will appear over the original location of your guide star
and PHD2 will start to move the mount in various
directions, tracking how the star moves as a function of what move
commands were sent to the mount. The status bar will display
the
commands as they are sent to the mount, along with the incremental
movements of the guide star relative to its starting position.
PHD2
will do this on both axes, first moving east and west, then
north and south. PHD2
typically wants to move the star up to 25 pixels in
each direction in order to get an accurate calibration. Once
this
is complete, the crosshairs will turn green and guiding will start
automatically. Because this is a measurement process that is
subject to various kinds of mount and atmospheric effects, the most
accurate results will be gotten when the scope is pointing within 20
degrees of Dec = 0 (near the celestial equator) and at least 60 degrees
above the nearest east/west horizon (i.e. within 2 hours of the
celestial meridian). Calibrations can be done in other pointing
positions if required by conditions at your site but they will be
subject to somewhat more measurement uncertainty. You cannot
do calibrations pointing very close to the north or south celestial
poles, and the mount must be tracking at the sidereal rate. If you encounter difficulties completing a calibration, you should immediately retry using the Calibration Assistant .
Although
PHD2 moves the guide star in all four directions, only the west and
north movements are actually used to compute the guide rates and camera
angles. The east and south moves are used only to restore the star
roughly to its starting position. Before the north moves are
begun, you will see a sequence of pulses that are intended to
clear backlash. PHD2 takes only a moderate approach to clearing
this backlash, watching for a clear
pattern of movement in a single direction with no reversals. If
your mount has a large amount of Dec backlash or you're guiding at a
long focal length in poor seeing conditions, this phase of calibration
may not remove all the backlash. Your best option to avoid this
problem is to use the Calibration Assistant. You may also see that the
south pulses leave the guide
star well-short of its starting position - this is another visual clue
that you have significant declination backlash in your mount but it
does not invalidate the calibration. If
you see evidence of sizable backlash, you can run the Guiding Assistant
tool and measure it directly.
In
most cases, calibration will complete automatically without any user
involvement, particularly if you are using the Calibration Assistant. If the mount doesn't move sufficiently in the west
or north directions, you will get an alert saying the calibration has failed.
Failures of this type are pretty uncommon but they can occur if
some part of the hardware is simply not working (e.g. a bad guide
cable) or if you haven't followed all the recommendations in the Calibration Assistant.
If
you're using an ASCOM (or Indi) connection for either the 'mount' or
'aux-mount', a good calibration can be re-used for a long time,
and that is the preferred way to operate. These connection
options allow PHD2 to know where the telescope is pointing, so a
calibration done at one point in the sky will be automatically adjusted
as you slew to different targets. The old rule of having to
re-calibrate whenever you slewed the scope or switched the side-of-pier
is a thing of the past so long as PHD2 has pointing information.
With this type of set-up, you would only re-calibrate if
you rotate the position of the guide camera by more than a few
degrees or make other major changes to the hardware configuration. If you chose
'auto-restore calibration' when you built your profile or chose that
option in the Guiding tab of the Advanced Settings dialog, you can simply
connect to your
gear, auto-select your guide stars, then begin guiding immediately.
Beginners will probably have more success if they do a fresh
calibration at the start of each night's session. Finally, if
you're using an instrument rotator as part of your
equipment
profile, PHD2 can use the 'Rotator' connection to adjust the
calibration data based on the angular position of the guide camera -
one less reason for re-doing a calibration.
You can
always review the results of your last calibration by using the 'Tools'
menu and clicking on 'Review Calibration Data' That will open a
dialog that shows a graphical representation of the mount's movements
along with the values that were computed for guiding your mount.
This window is described elsewhere in the Calibration Details
section of the help file. As a quick quality check, you can open
this window and confirm that 1) the RA and Dec lines are roughly
perpendicular and 2) the plotted points are roughly linear with
no significant curves, bends, clumping of points, or reversals in direction. If
you do see these kinds of odd patterns in the graph, you should
probably re-do the calibration. Even with high-end mounts,
calibrations can occasionally go awry because of environmental
conditions, especially wind and bad seeing.
After
a calibration is completed, PHD2 will "sanity check" the results to be
sure the calculations at least look reasonable. If they don't,
you will see an advisory message at the top of the main window that
describes the situation. You can
choose to ignore the alert or click on 'Details' to get more
information. It is generally advisable to pay attention to these
alerts because there is no point in trying to guide using a significantly bad calibration.
Adaptive Optics Devices
If
you are using an adaptive optics device, there are actually two
calibration processes that must complete. The first handles
calibration of the tip/tilt optical element in the AO and calculates the
magnitude and direction of the adjustments as they relate to
displacements of the guide star. The second calibration is
the
one described above, dealing with guide commands that need to be sent
to the mount. Known as "bump" commands, these will be
issued when the guide star has moved beyond the range of
corrections that can be achieved with the AO alone.
Guiding
Once guiding has begun,
diagnostic messages will be displayed in the status bar to show what
guide commands are being sent to the mount. PHD2
will continue guiding until you click on the 'Stop' icon. To
resume guiding, simply start looping exposures again, auto-select your stars,
and click on the 'Guide' button. You will not need to repeat
the
calibration in order to resume guiding.
In some cases, PHD2 may lose the guide star and
you'll be alerted by an audible beep and flashing orange crosshairs.
There are several reasons this might occur:
- Something may be obscuring the star - clouds, the
observatory roof, a tree, etc.
- The
star may have abruptly moved out of the tracking rectangle because
something shifted in the mount/camera/cabling infrastructure - cable snags can cause this
- The star may have "faded" for some other reason, perhaps
because it is overly faint, the camera is not well-focused, or the star
size and brightness is fluctuating above and below the thresholds for
acceptability.
- The
star's brightness may be fluctuating enough to trigger the star-mass
checking feature. If this happens frequently, the feature should
be disabled (Advanced Settings/Guiding tab)
Obviously,
you'll need to identify the source of the problem and fix it.
It's important to understand that PHD2 will not start
moving the telescope trying to relocate the guide star.
It will simply continue to take exposures and look for a
guide
star to reappear within the bounds of the current tracking rectangle.
If the lost star condition persists for a considerable time,
your mount will probably drift signiificantly off-target. In that
event, a later recovery of a guide star in the tracking region is
likely to be a different star and your imaging target won't be properly
centered. If you're doing unattended imaging, the imaging
application should handle this situation by recentering the frame after
star recovery has occurred - this is not something that can be done by
PHD2. Isolated or intermittent lost-star events do not usually
cause poor guiding or ruined images. But extended periods of
lost-star events can allow the mount to go too long without guiding
corrections and the image quality may suffer.
When you first start guiding, you may see an 'alert' dialog at
the top of the window if no dark library or bad-pixel map is being
used. You can choose to ignore this warning and continue with
guiding, but you will probably get better results if you spend the few
minutes needed to construct a dark library for future use.
If
you are using a German equatorial mount (GEM), you will usually have to
do a "meridian flip" around the time your image target crosses the
meridian. This means you (or your imaging application) will move the
telescope around to the opposite side of the pier and then resume
imaging. Doing this invalidates the original calibration,
typically because the declination directions are now
reversed. If you are using an ASCOM (or 'aux' ) mount interface, your
calibration will be adjusted automatically and you can simply resume
guiding (assuming you haven't also rotated the camera or focuser).
If you aren't using an interface that returns pointing position, you will need to
take
action to adjust the guider calibration. You can, of course,
simply do another
calibration on the current side of the pier, a process that will
typically take only a couple of minutes. Or, you
can use
the pull-down menu item under 'Tools/Modify Calibration' to "Flip Calibration Now" and
then resume guiding immediately. Note: 'flip calibration data' will have no effect if PHD2 is using an ASCOM or 'aux-mount' connection.
In some cases, you may
want to force a re-calibration. For example, you may have
rotated
the guide camera as part of resolving a cable problem. You
can do
this by clicking on the 'Brain button', moving to the 'Guiding'
tab, and clicking the 'Clear mount calibration' checkbox. Or, you
can
simply do a <shift>click on the 'Guide' button
on the main
screen and PHD2
will start a calibration run.
Once
you have started guiding, you will almost certainly want to know how
things are going. You can of course watch the star in the
guide
camera display but in many cases you won't be able to see all the small
adjustments that are taking place. PHD2 provides many
tools
for measuring and displaying your performance, as described in the Monitoring Tools section.
Several of the guiding algorithms have limit settings for the
maximum guide correction that can be issued with a single command.
If these values are smaller than what is needed to correct the
mount's position, you will see an alert dialog at the top of the main
window
advising you of the situation. If this is a recurring problem and
you haven't reduced the max-move parameters below their default values,
the source of the problem probably lies with the mount.